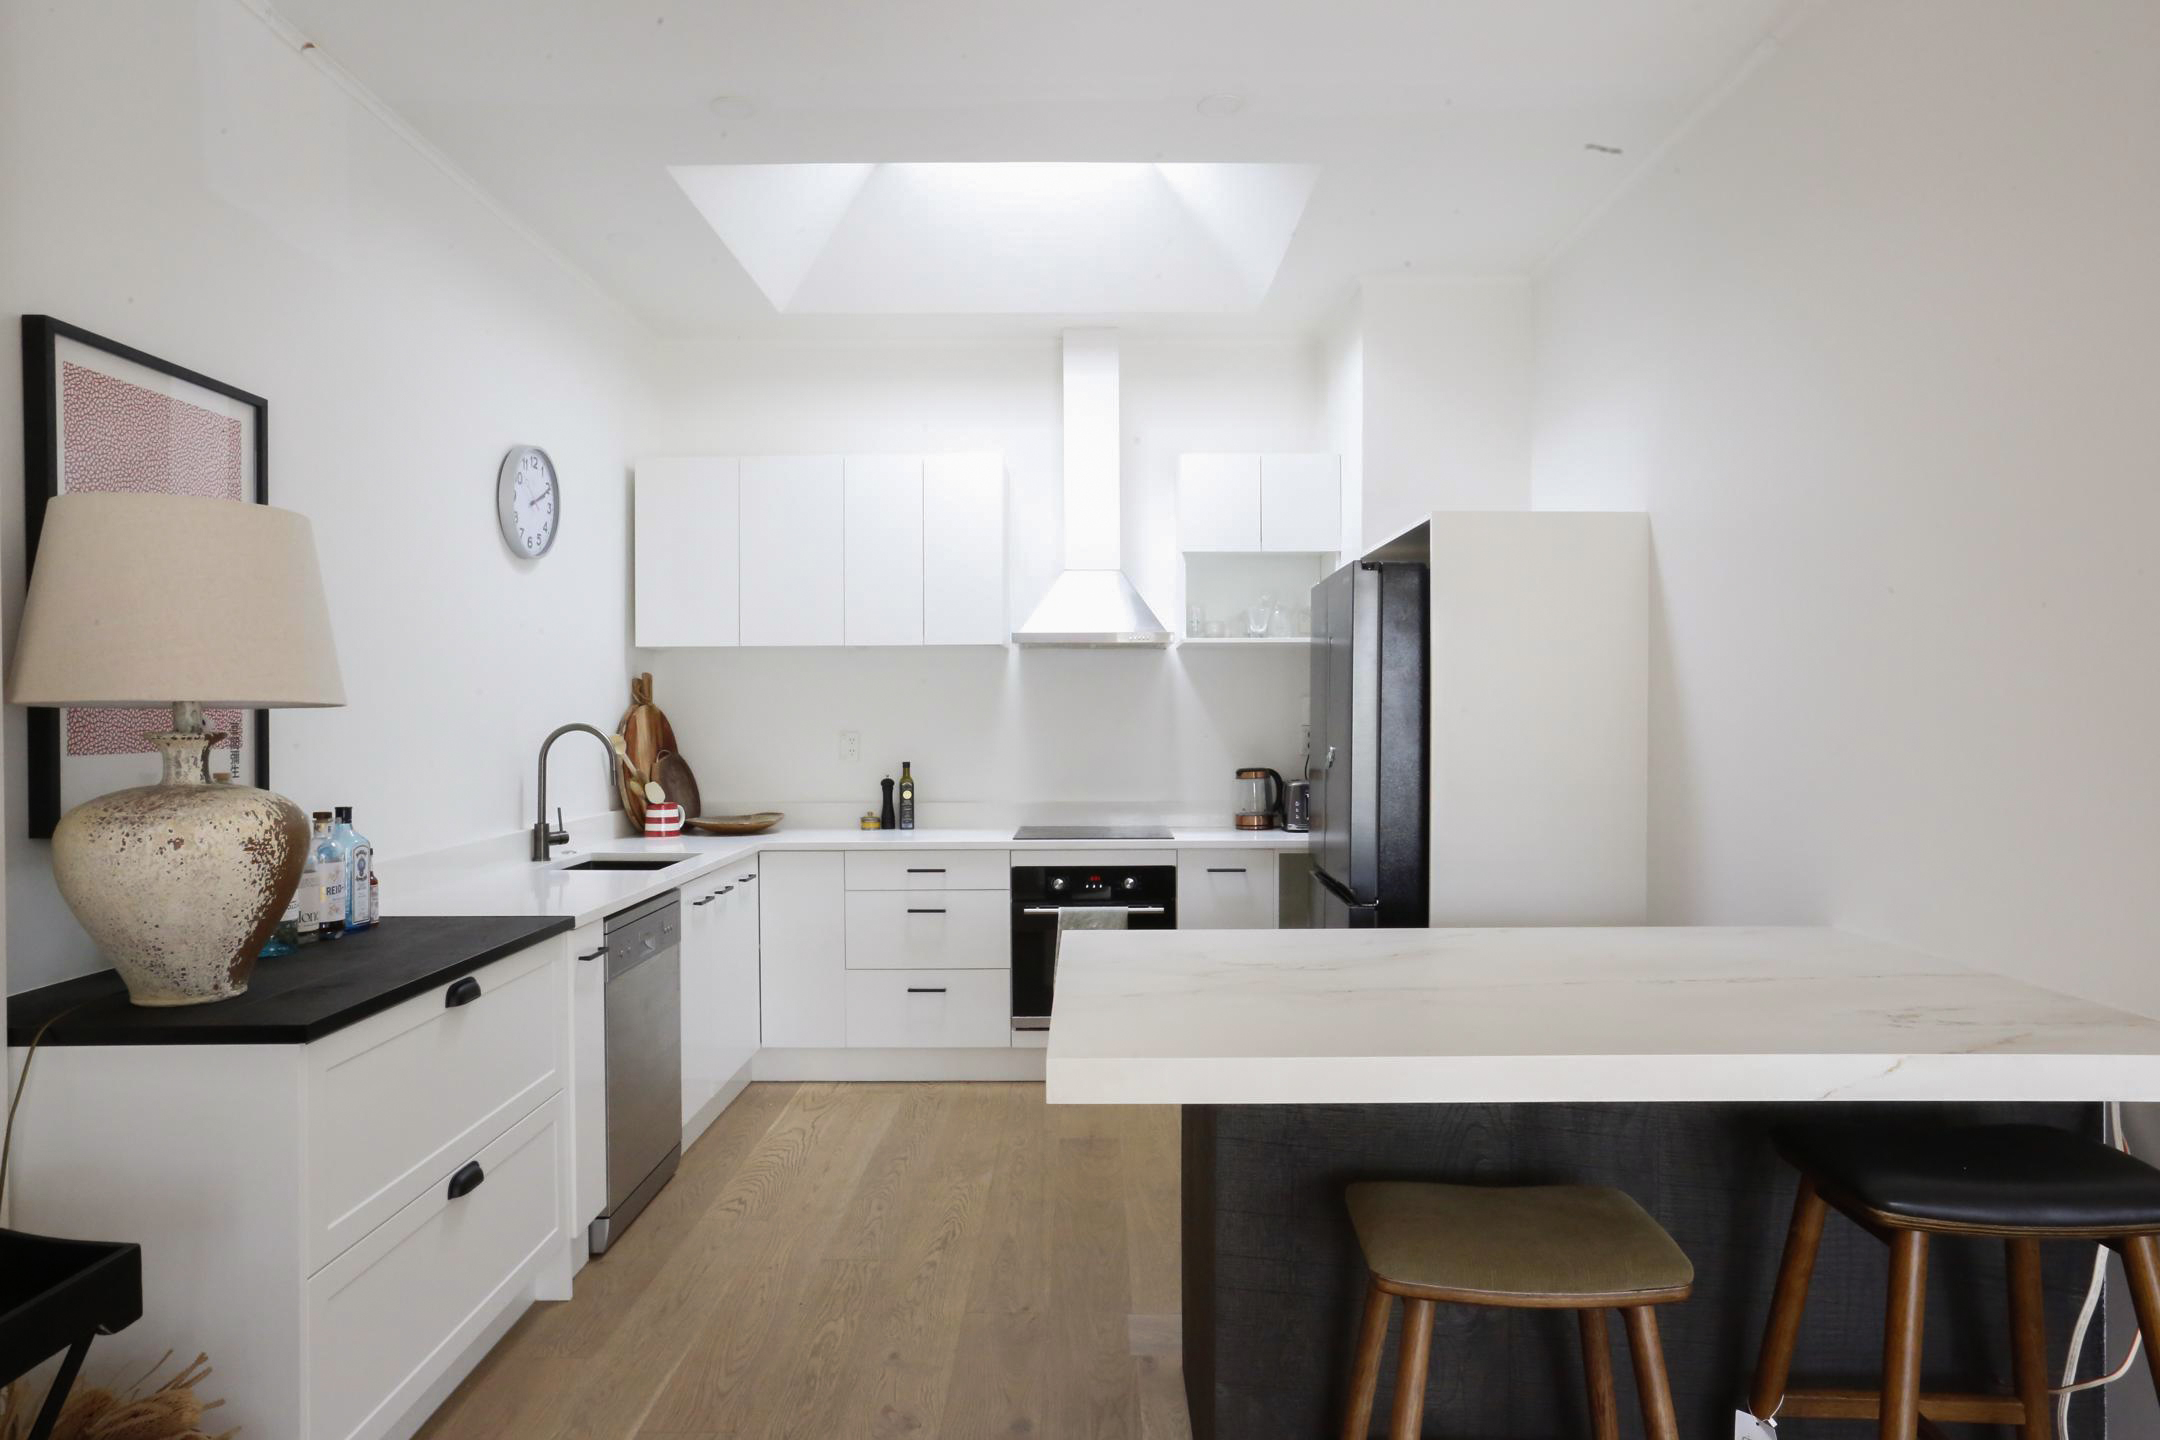
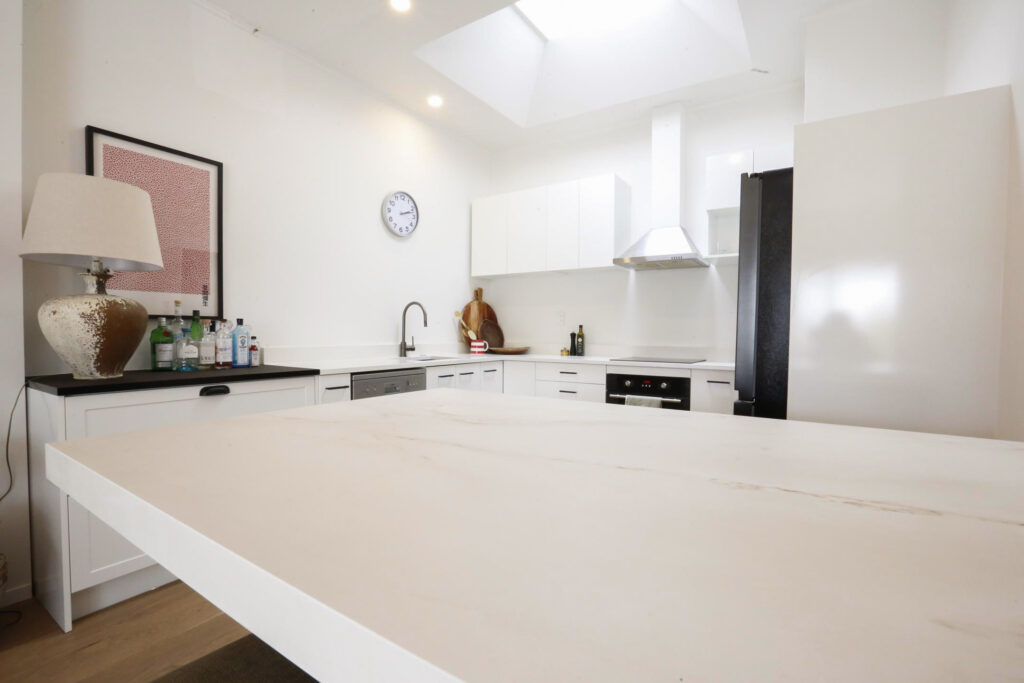
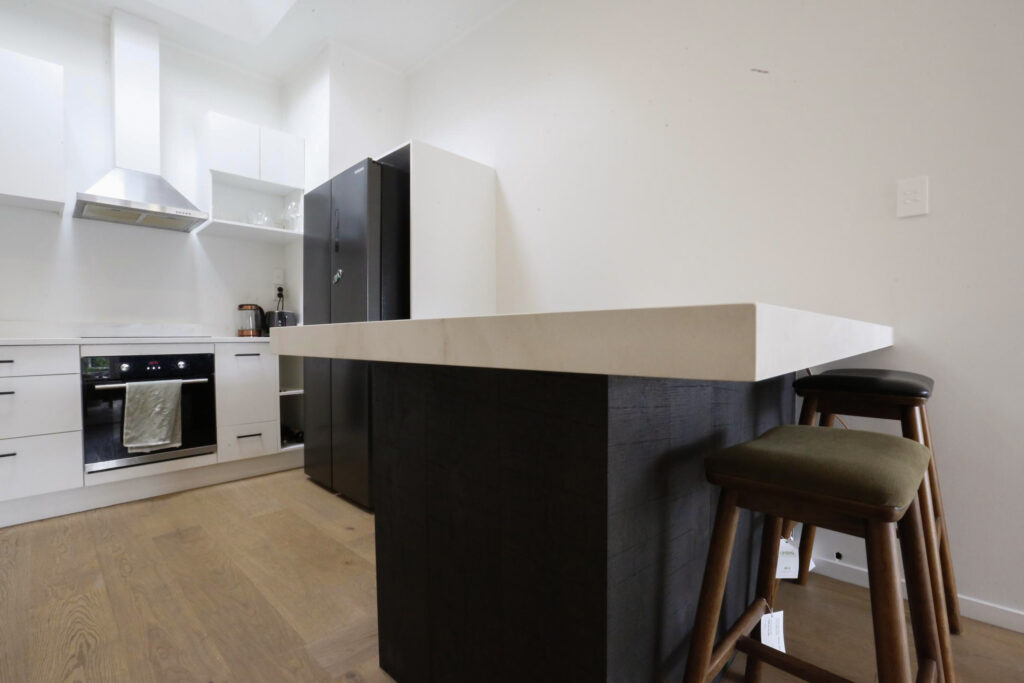
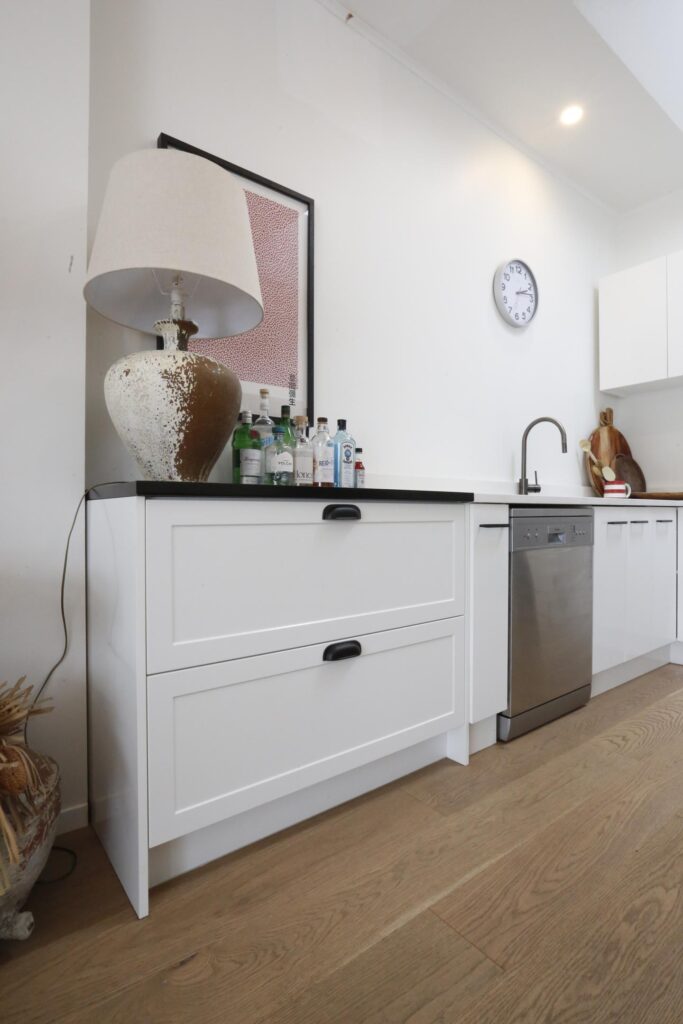
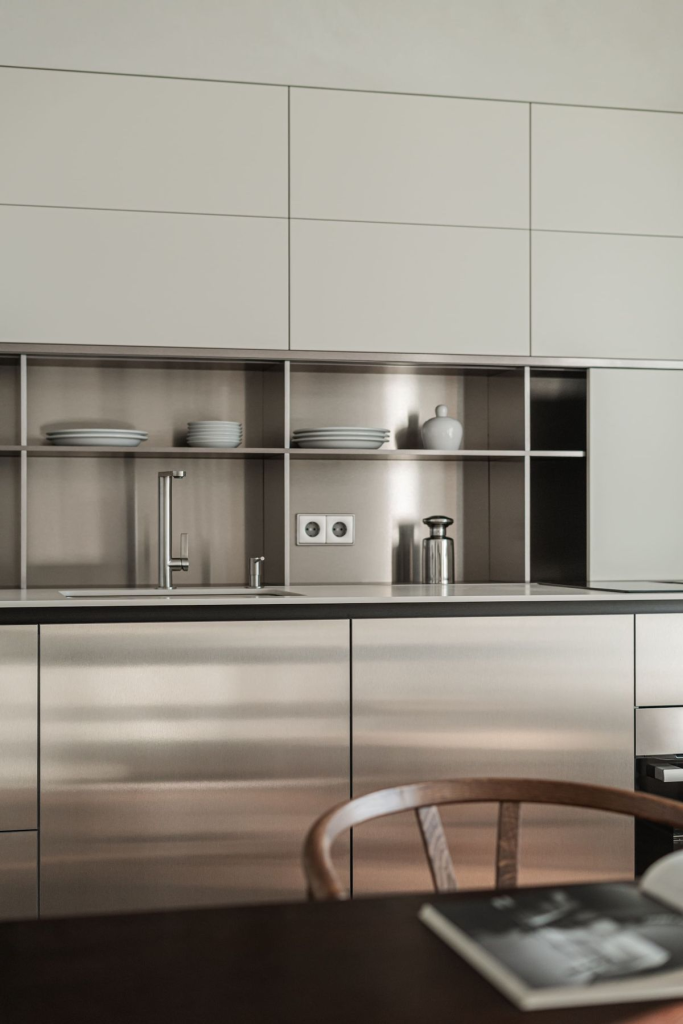
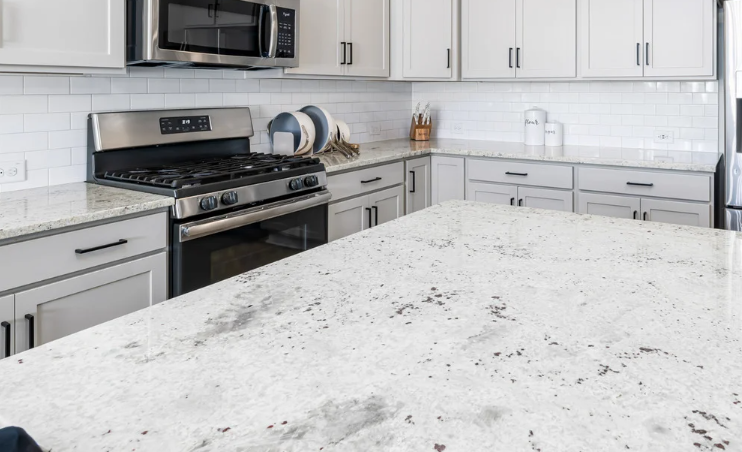
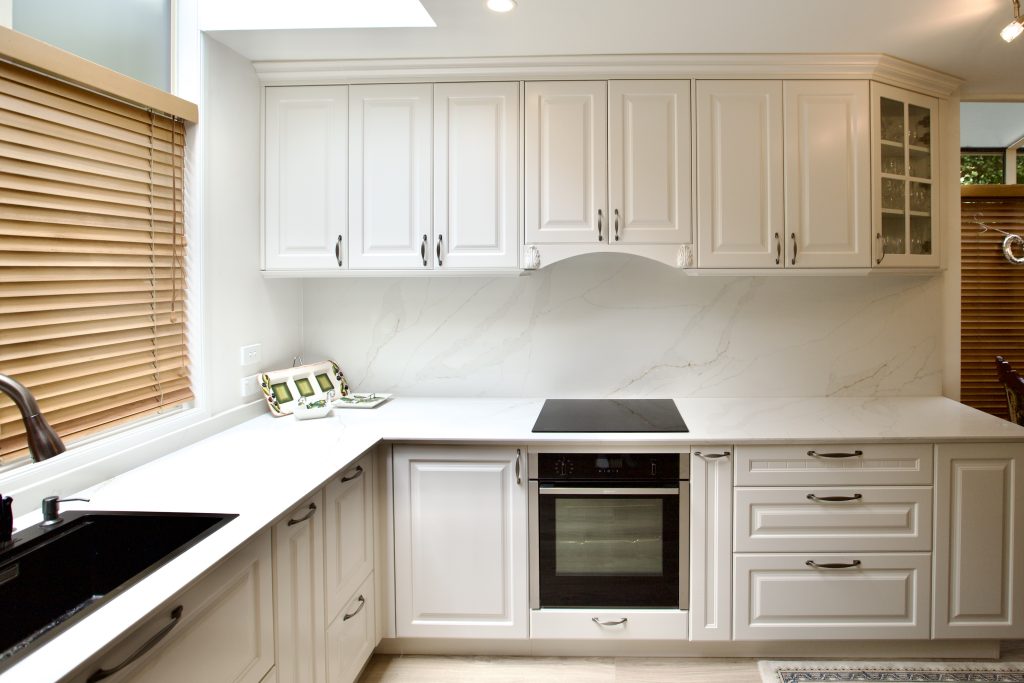
Our expertise was called upon to deliver some finishing upgrades for this modern white kitchen in Freeman’s Bay. In upgrading this existing kitchen, BoxMakers’ role covered the benchtop, island, and of course, some custom cabinetry.
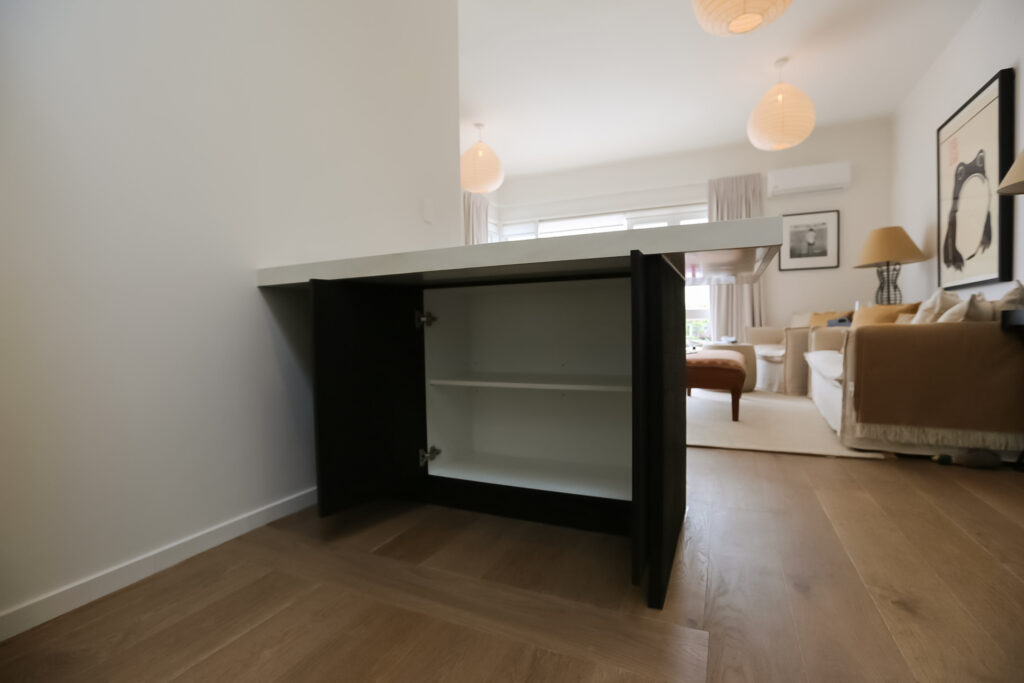
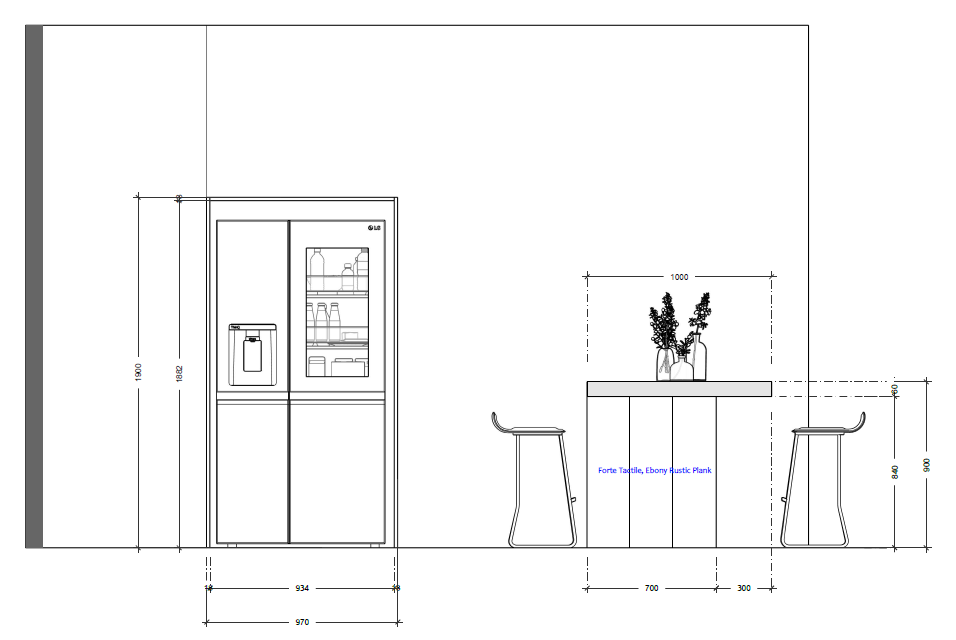
The first order of business was the kitchen island, which featured an incredibly mature blend of Melteca’s Blackened Ash Organic finish and Forté’s Ebony Rustic Planks. This gives a layered, tactile, and storied appearance that divulges detail to those with a keen eye. Capping it off is Consentino’s Dekton Rem benchtop, whose hurried streaks of stormy veins gently grace the soft white face – a choice pairing for this elegant white kitchen.
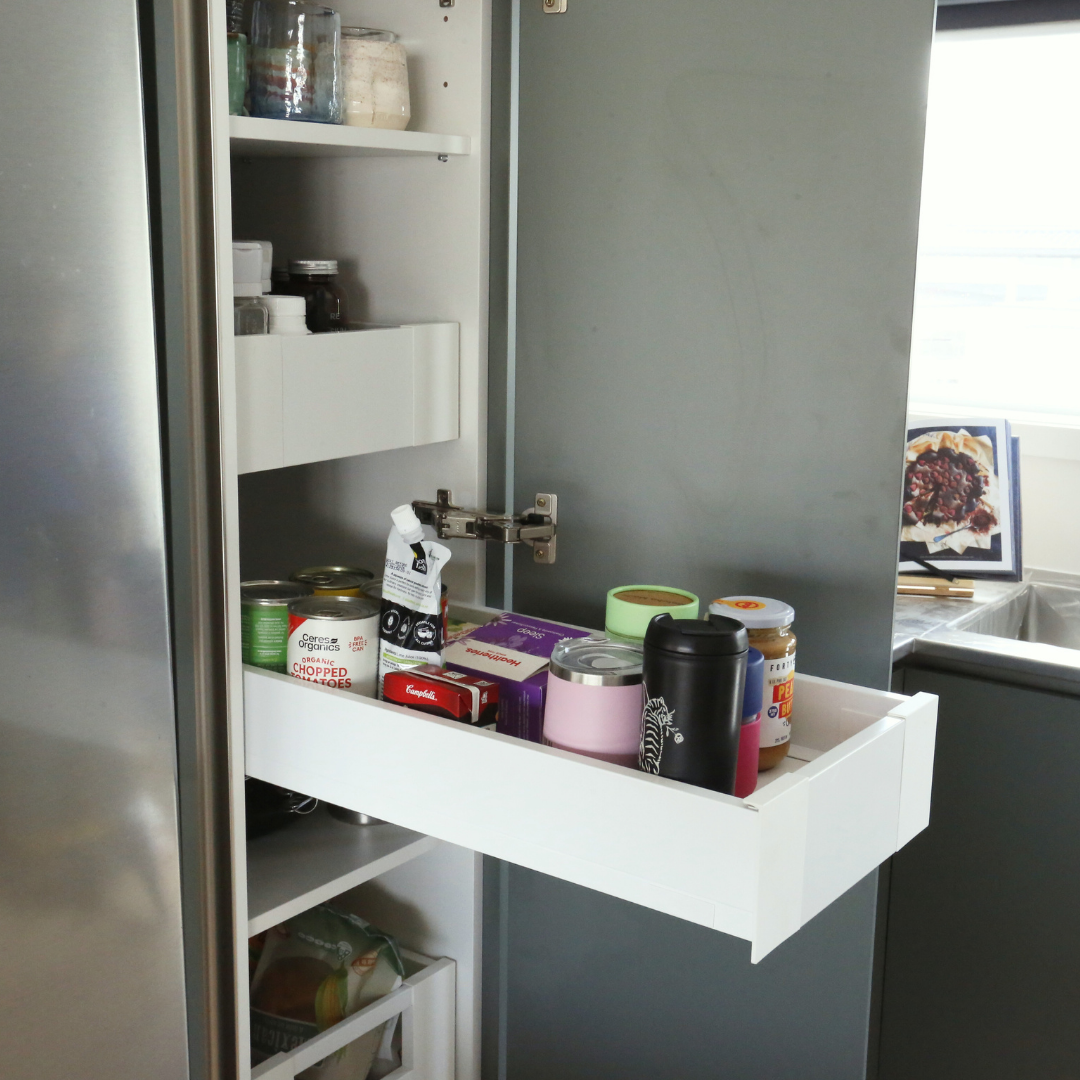
Behind it, BoxMakers carefully devised and installed a fridge cabinet – a simple yet effective white shell that handily covers and complements any appliance. We also installed a hidden bin, from Fit NZ’s Simplex series, making waste concealment even more convenient.
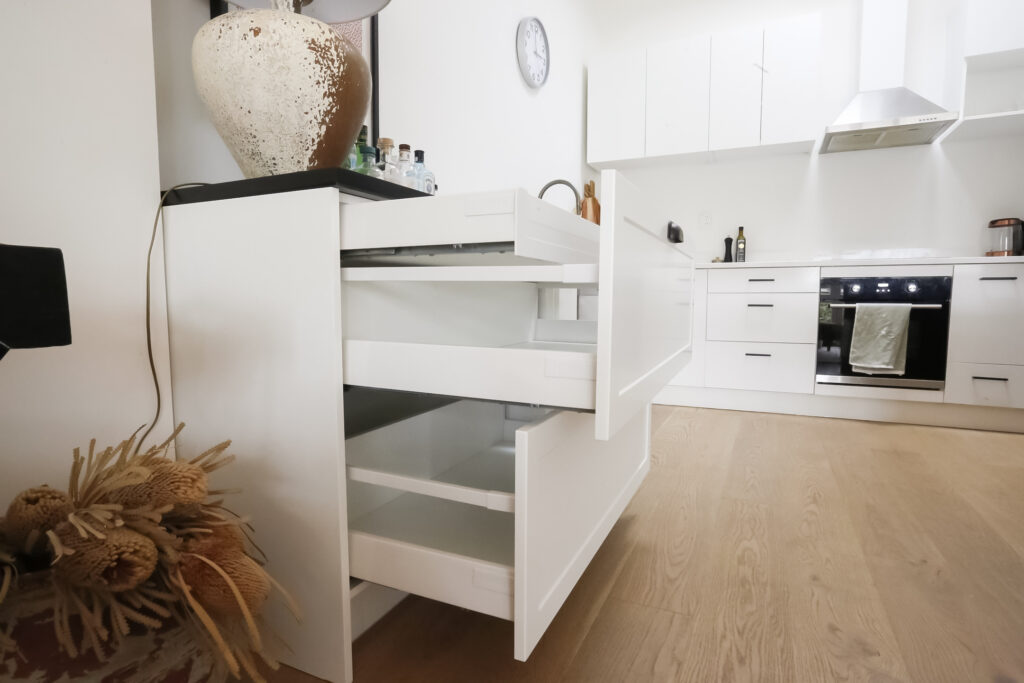
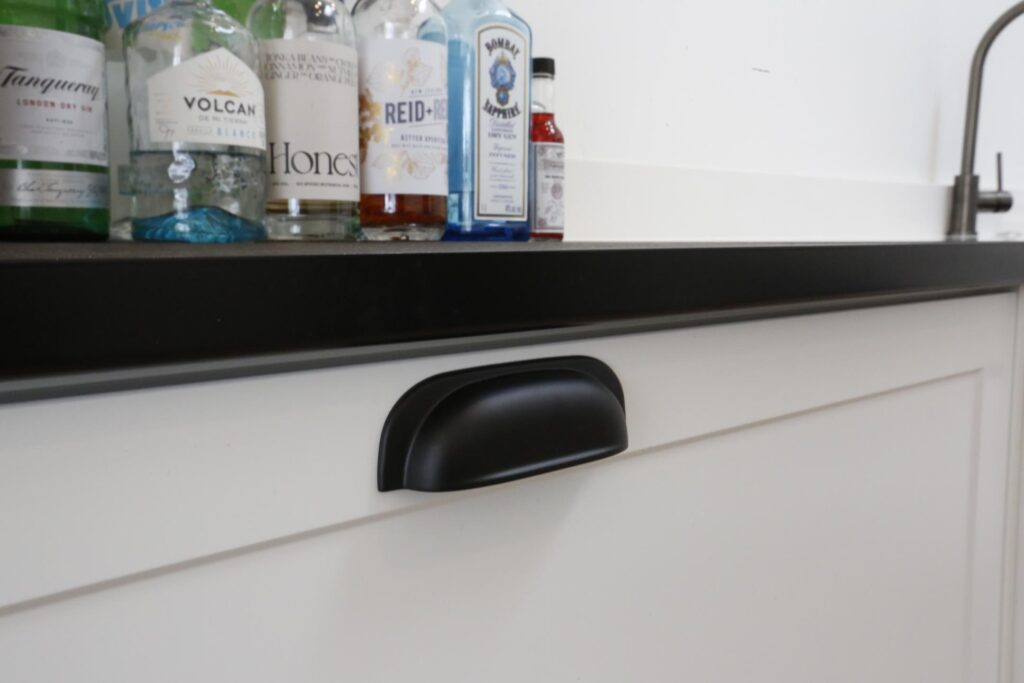
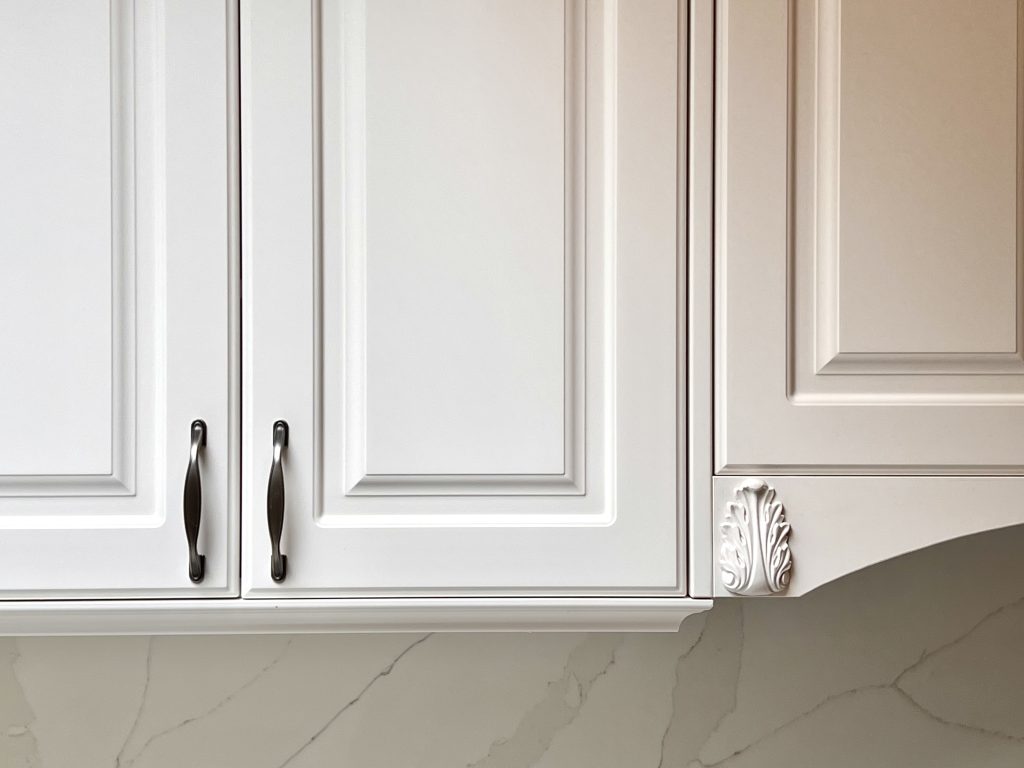
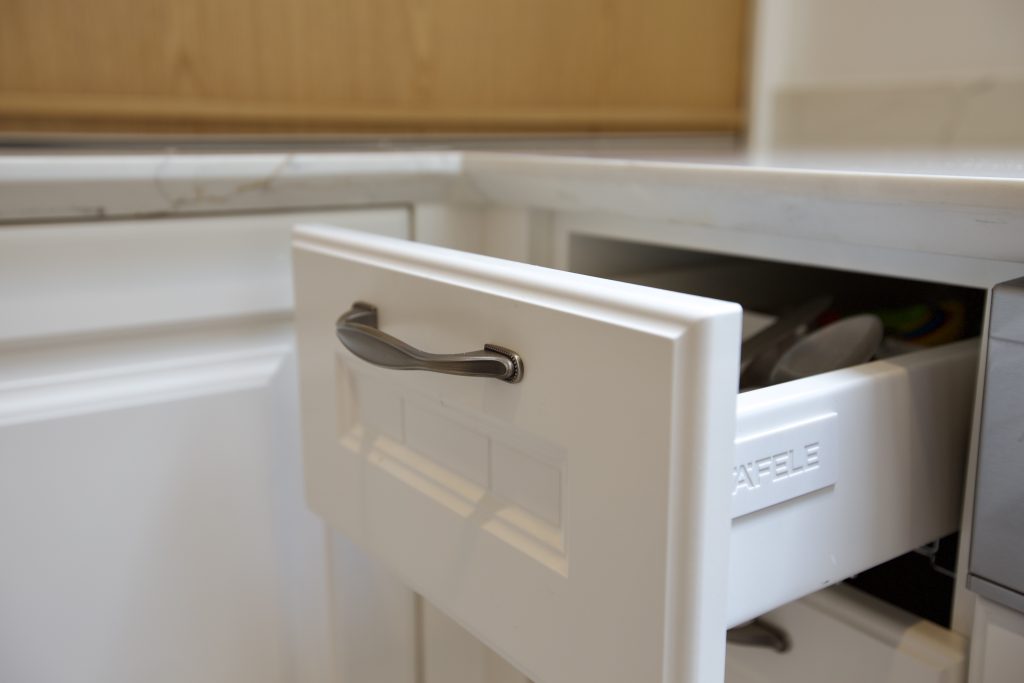
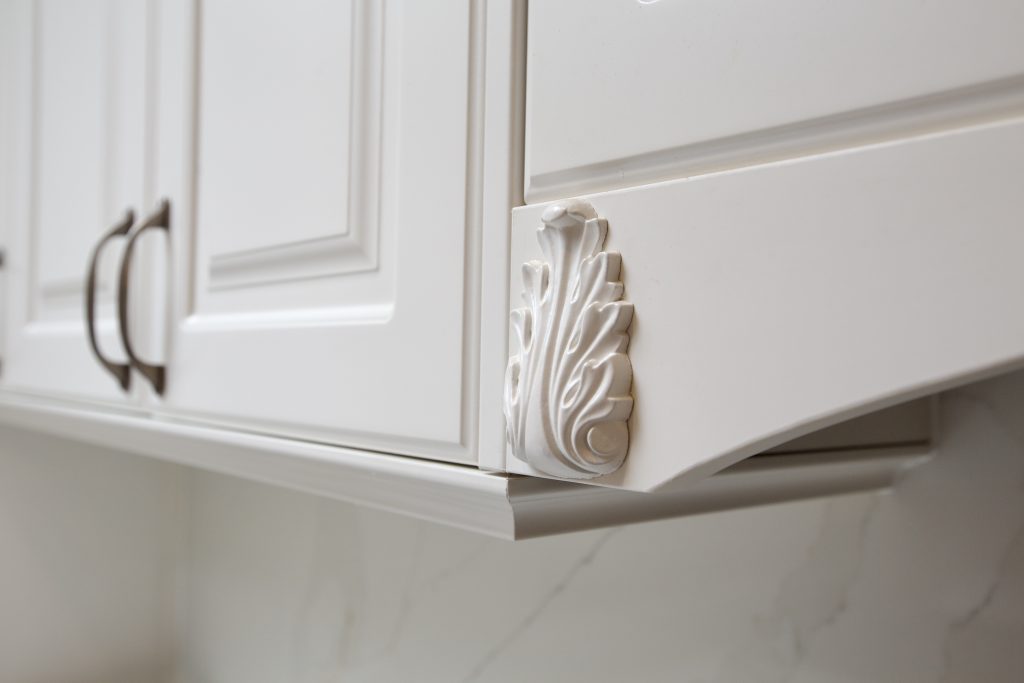
Opposite the island, we fashioned a standalone kitchen cabinet, cut and measured perfectly to seamlessly integrate with the finished kitchen height. It features glossy Arctic Ice from Bestwood, combined with the same Ebony Planks found on the island, and adorned with Mardeco’s Kitchen Cup handles. Even more interesting is its internals, which features a sneaky two and a half drawer arrangement with all-Häfele components.
Stretching across the kitchen is the pièce de resistance, in the form of the benchtop. BoxMakers installed Prime Panels’ Papamoa series – a subtly speckled slab in a matured shade of white.
The combination of light and dark elements creates a dynamic sense of contrast in this kitchen, but one thing is for certain – every new addition adds both elegance and maturity.
Designed by: Mona Simathamchai
Looking for new cabinetry or thinking about a kitchen renovation? Call us on 09 827 1177, or send us an email at [email protected]
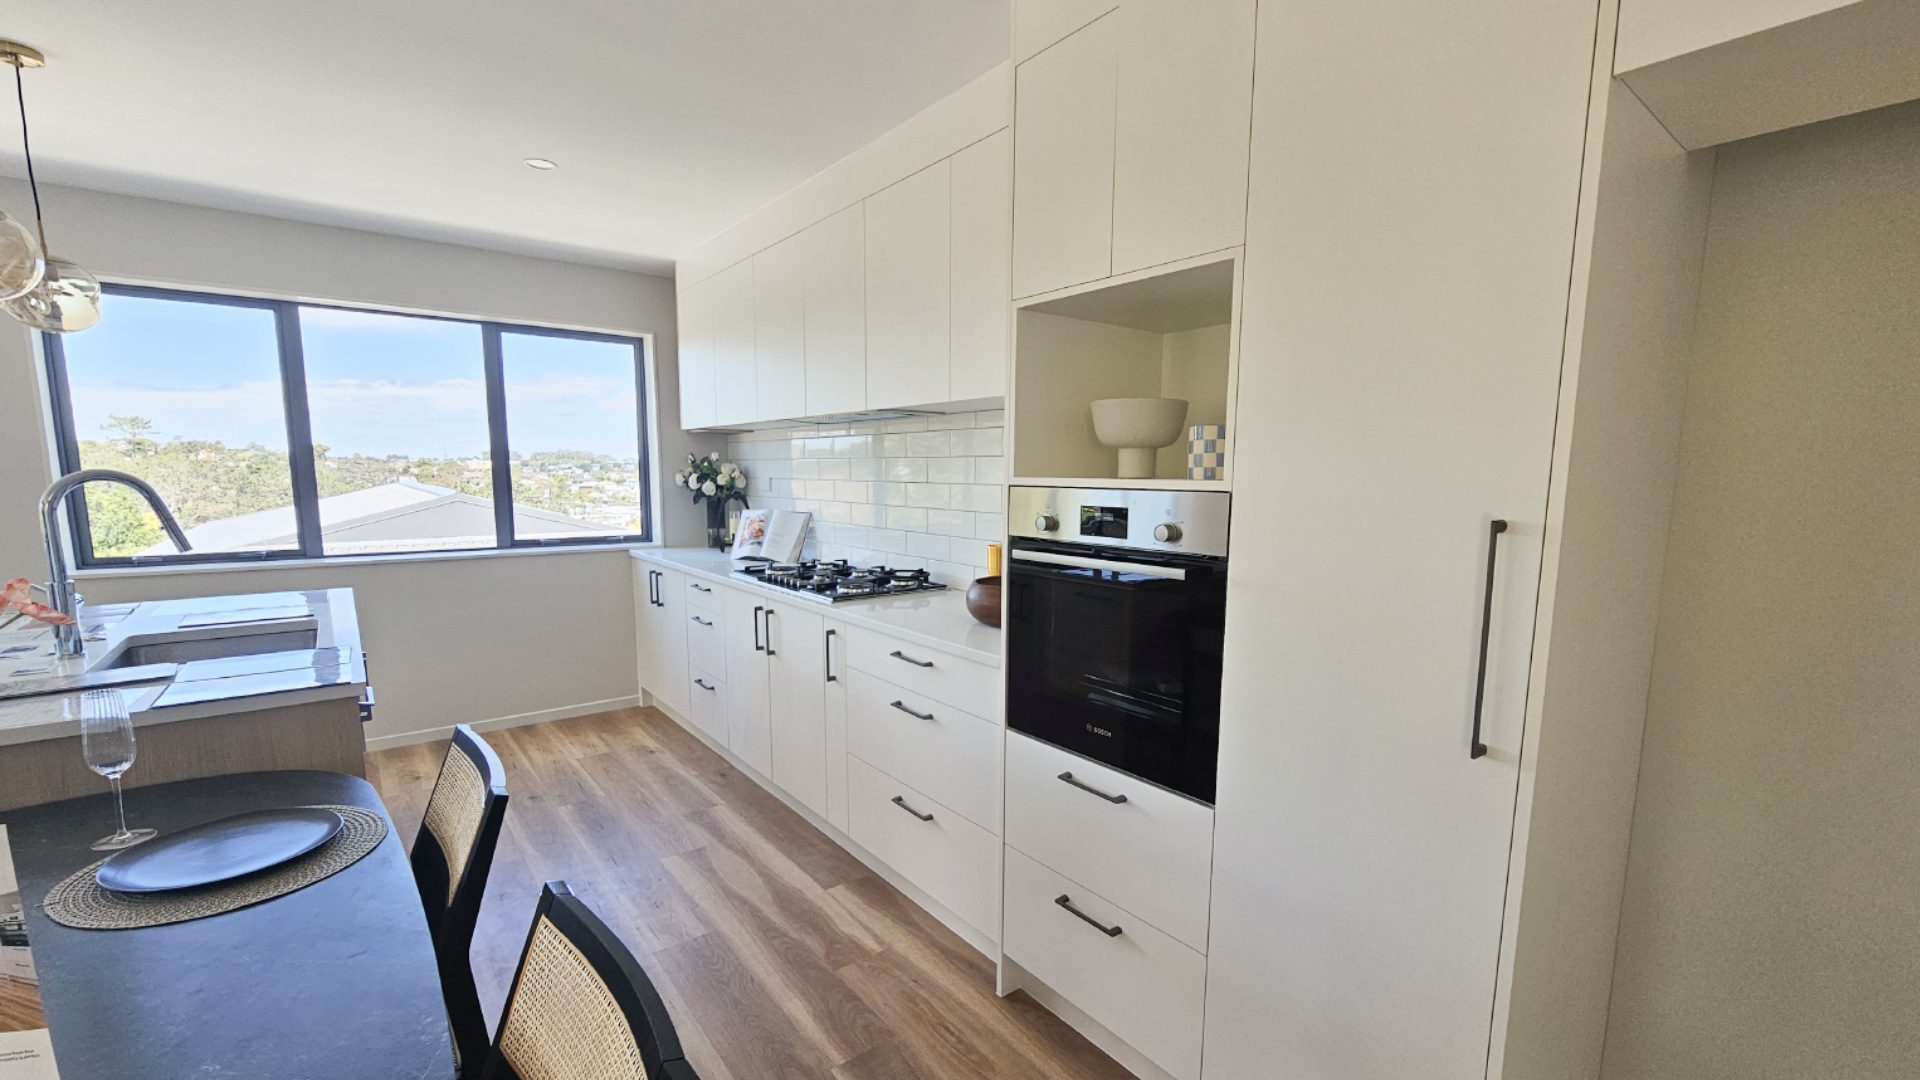
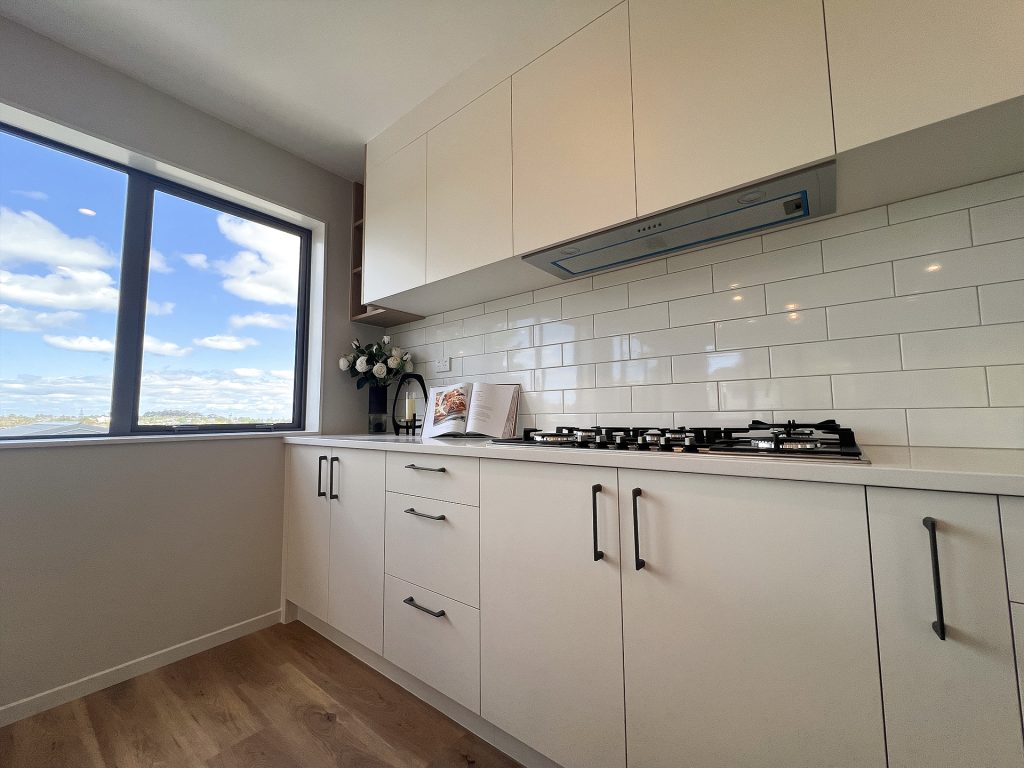
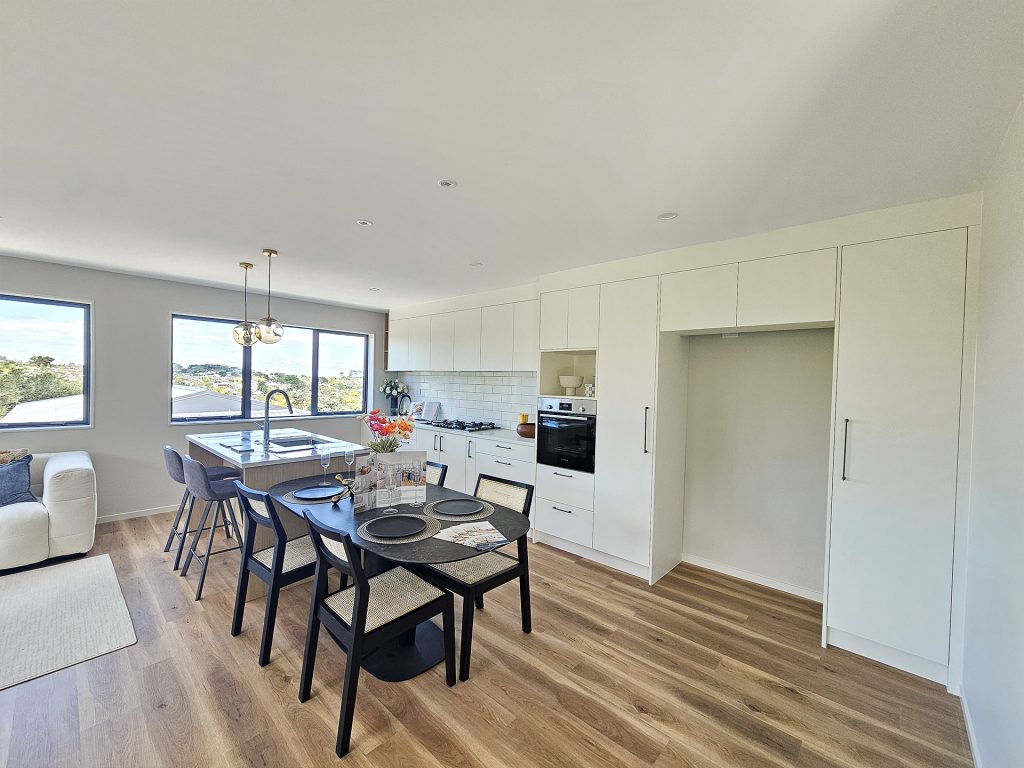
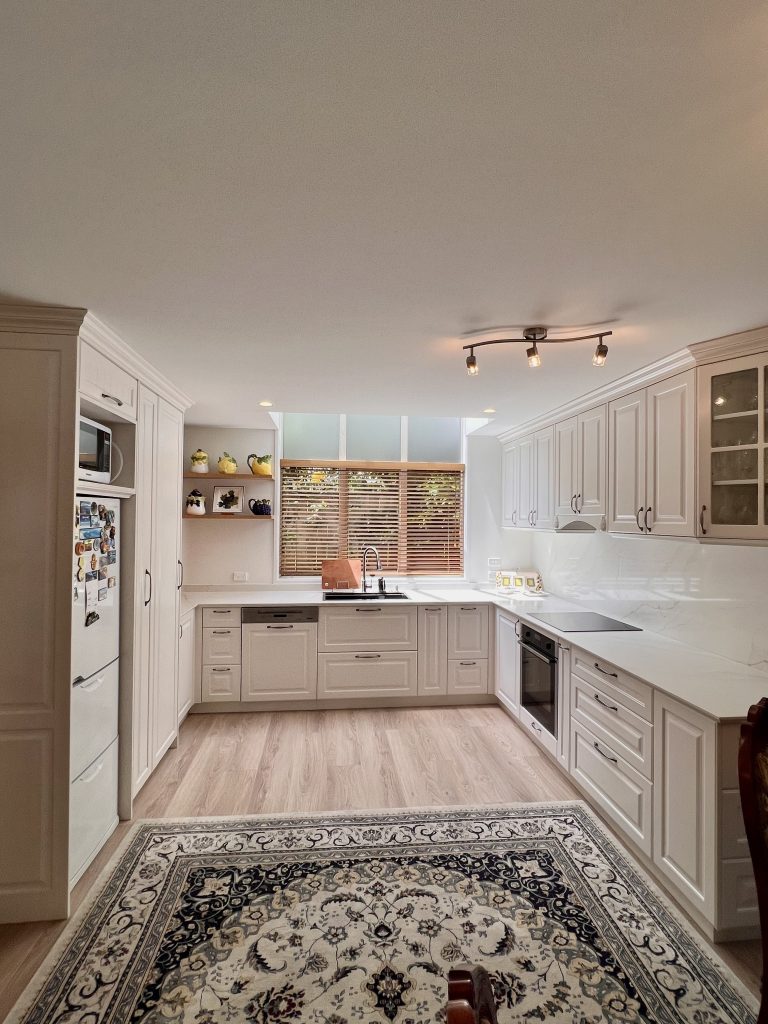
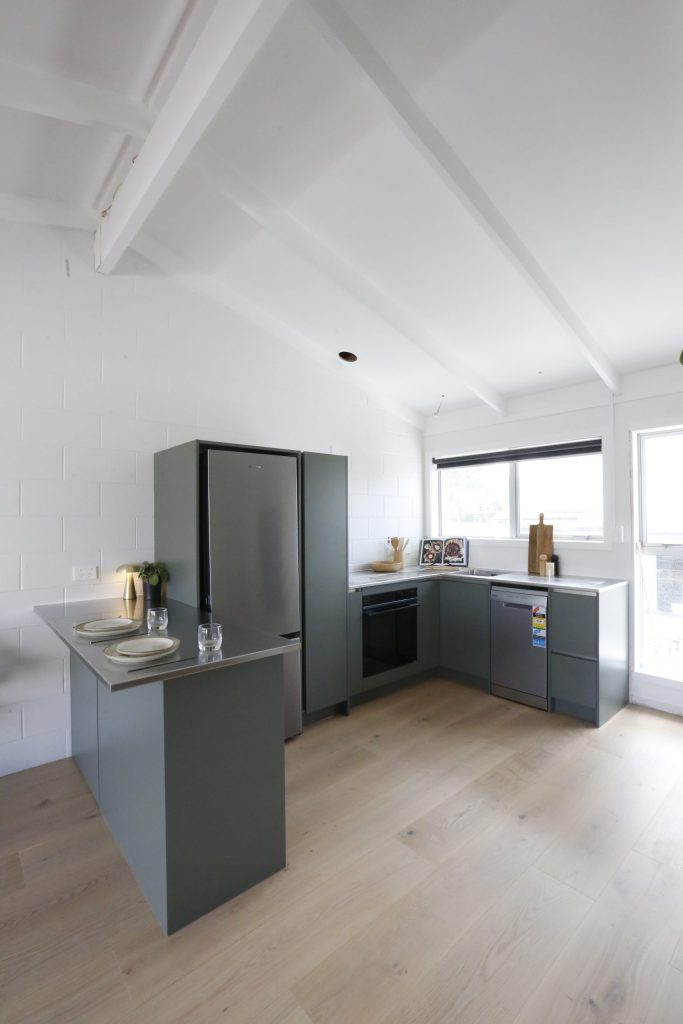
The second lot of the Sunnynook homes offers a quaint, yet dazzling modern kitchen. BoxMakers took great care to design it with efficiency and space-saving in mind, while touting a full-feature set, sleek new appliances, and of course, loads of quality cabinetry.
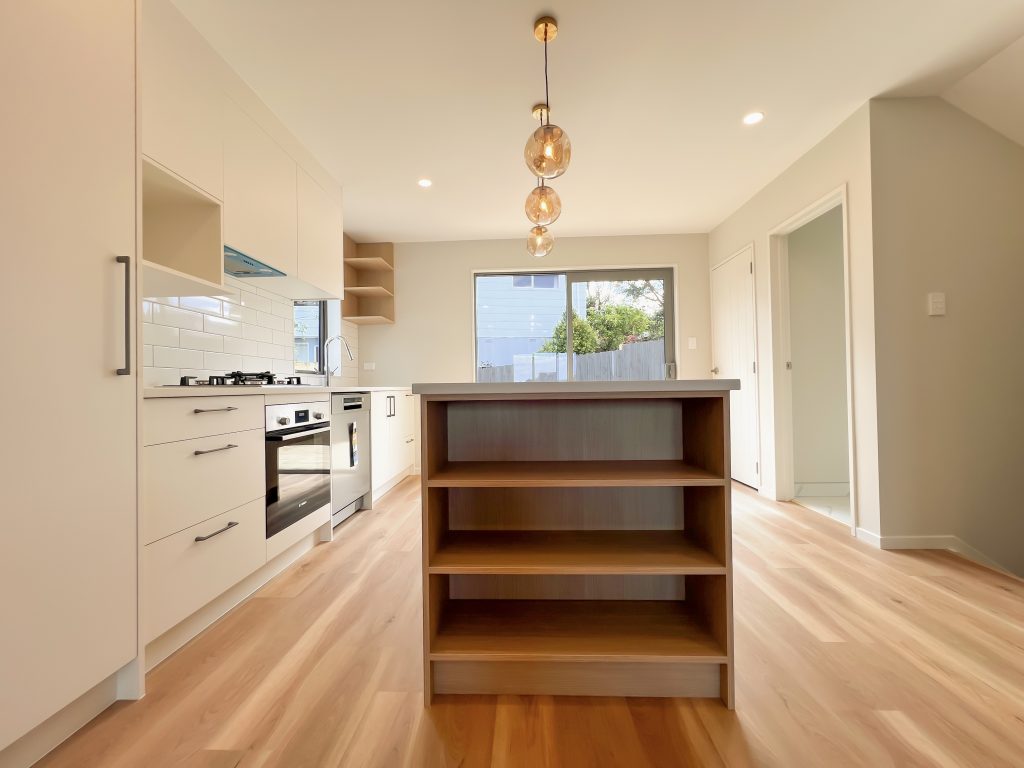
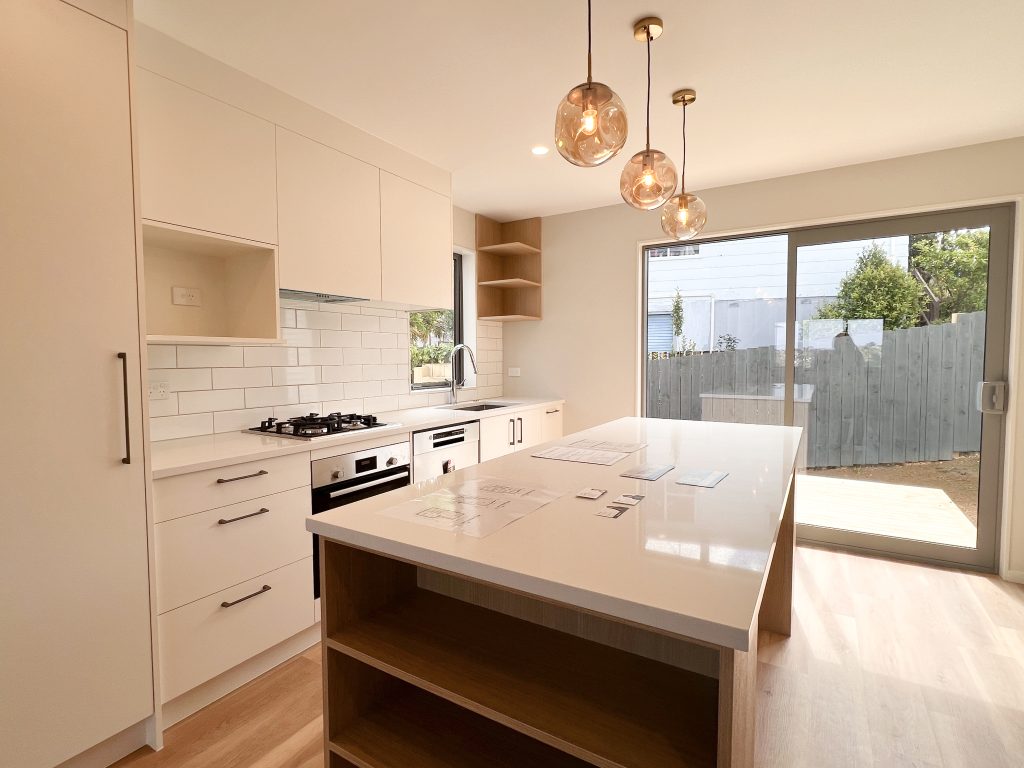
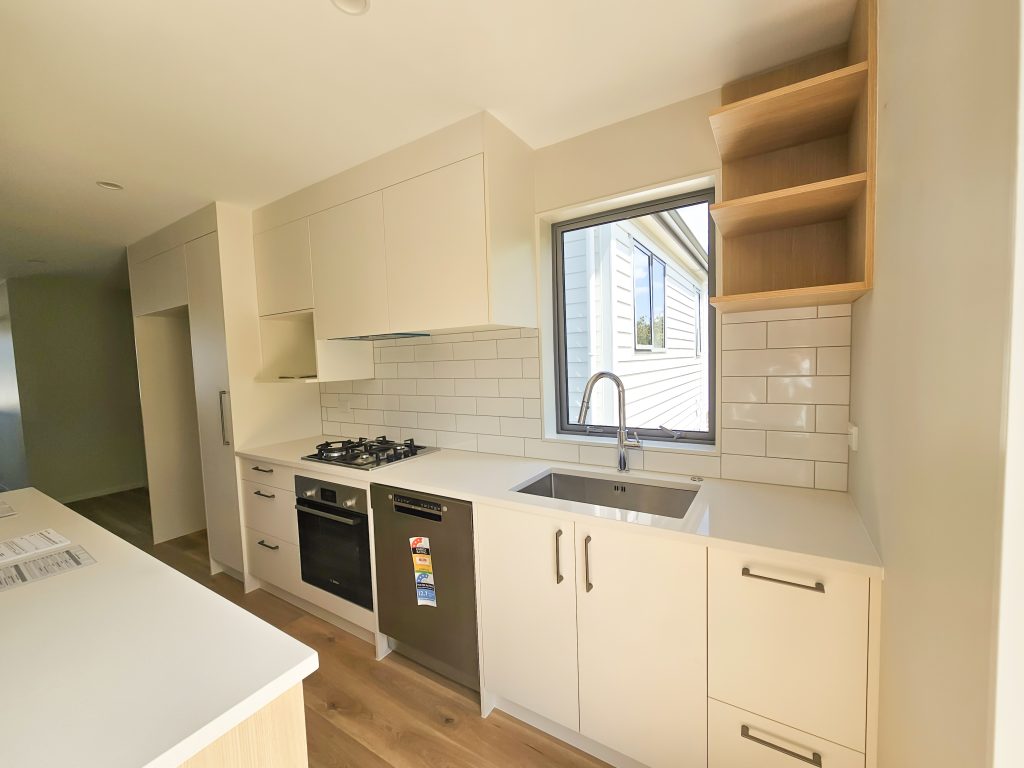
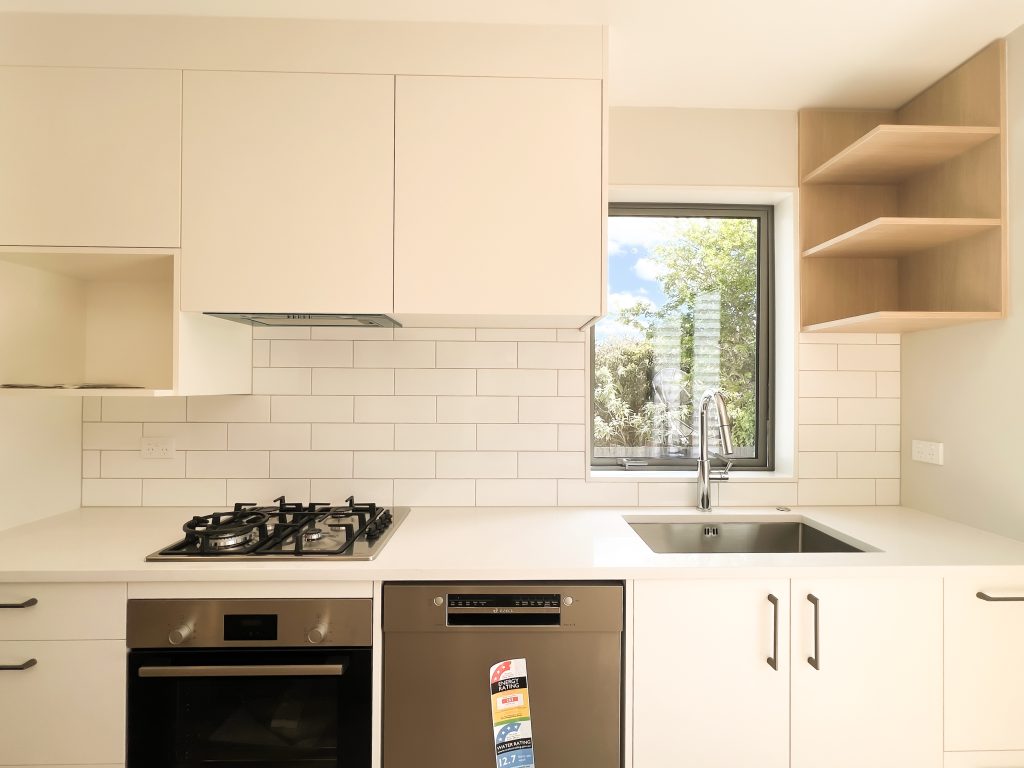
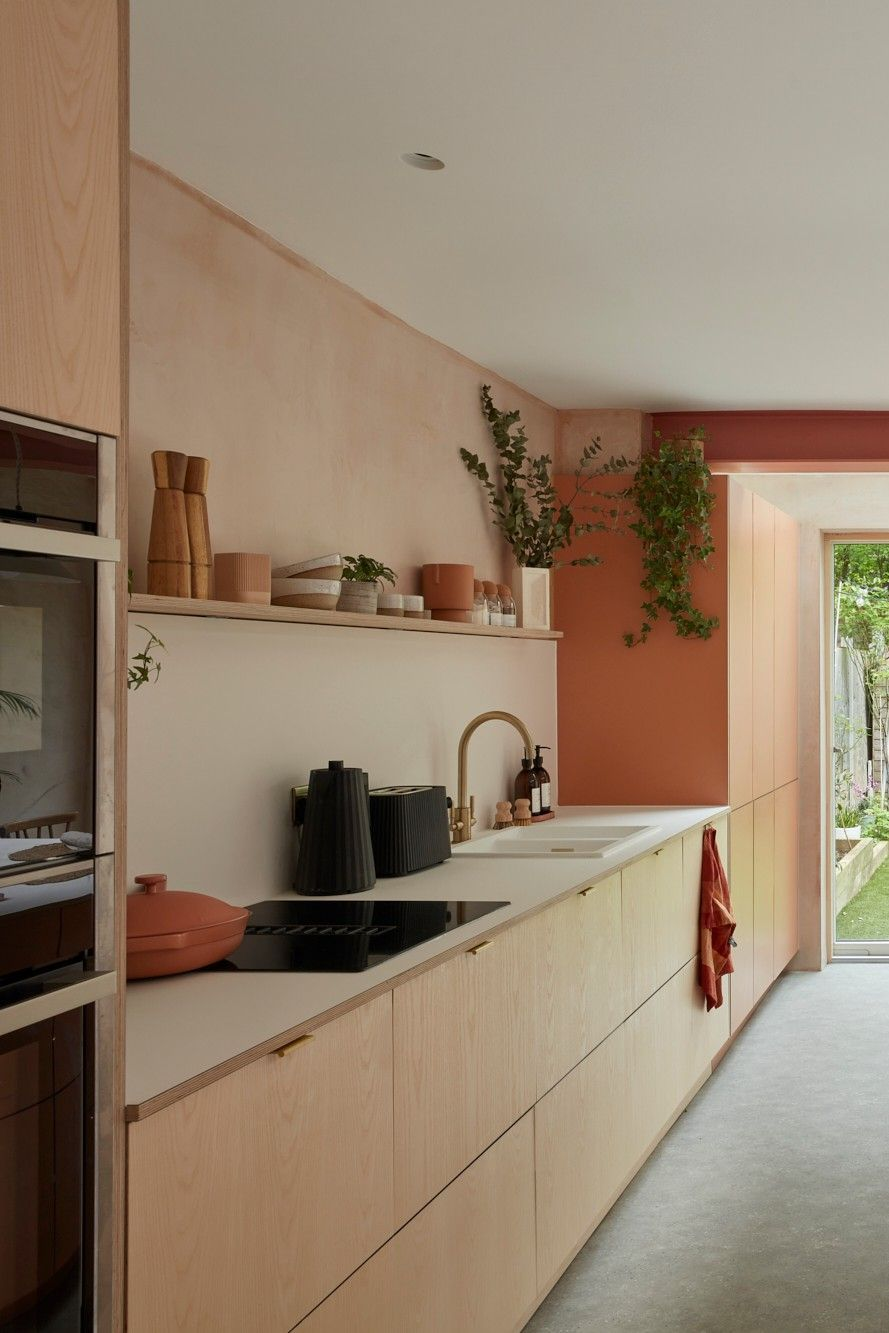
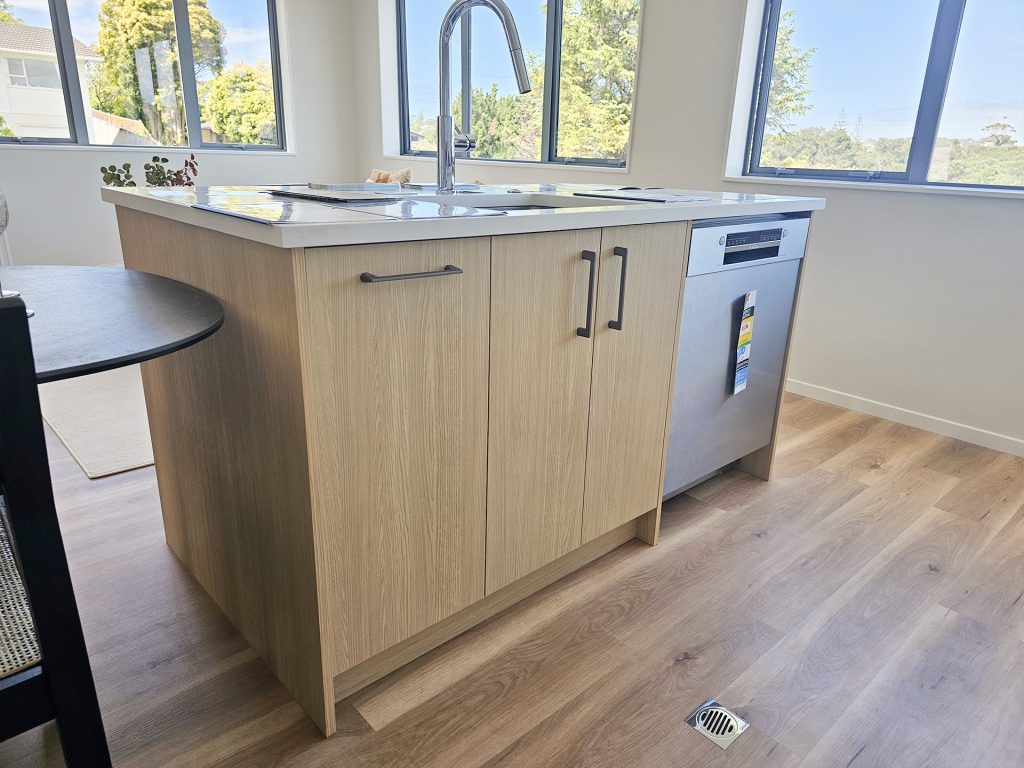
Lot 2’s kitchen takes on a distinct identity thanks to its cosy upstairs location. It uses a single wall + island layout, and is accompanied with plenty of natural light thanks to a convenient splashback window and a beautiful sliding door. Similar to the other lots, the kitchen combines Prime Panels’ Quarter Thorndon Cream with Melteca’s Aged Ash for a white & light wood finish.
The kitchen island applies the woodgrain to great effect, with convenient table-end shelving below a white benchtop. Above, the warm, golden glow of the island pendant lights conjure magical moments in the evening, bathing the kitchen with a soft, nurturing radiance.
For such a compact kitchen, it certainly packs quite the repertoire of storage. Including everything from overhead handleless doors, to hanging cubbies, to cornerside shelves, this assortment of cabinetry allows this kitchen to punch well above its weight.
Keeping consistent with this blend of modernity and practicality, even the smaller lot 2 kitchen holds its own thanks to a clever implementation of cabinetry and well-integrated appliances.
Designed by: Mona Simathamchai
Looking for new cabinetry or thinking about a kitchen renovation? Call us on 09 827 1177, or chuck us an email at [email protected]
When planning a kitchen or renovation, one of the biggest decisions sits behind the doors: what your cabinets are actually made from. Each material has its own strengths, limitations, and ideal use cases. The right choice depends on your budget, lifestyle, design goals, and how the space will be used day to day.
Below is a clear breakdown of the most common cabinet materials used in New Zealand homes.
1. Solid Wood
Solid timber cabinets are made from natural wood boards, offering a timeless and authentic appearance. Popular species such as kauri, matai, jarrah, and oak each bring unique grain patterns and tones, meaning no two kitchens will look exactly the same.
Advantages
Long-lasting and structurally strong
Natural beauty that ages well
Good acoustic qualities
Disadvantages
Sensitive to humidity and temperature changes
Can expand, contract, or crack if not properly treated
Typically higher cost due to craftsmanship
Ideal for:
Homeowners who value natural character and are willing to invest in a classic, durable look.
Pro Tip:
Ensure timber is correctly sealed and installed with allowance for movement. Wood species selection matters — some are more stable than others in changing climates.
2. Medium-Density Fibreboard (MDF)
MDF is an engineered wood product created by compressing fine wood fibres with resin under high heat and pressure. It provides a smooth, consistent surface, making it a popular choice for painted cabinetry.
Advantages
Smooth finish ideal for paint
Cost-effective compared to solid wood
Stable and uniform surface
Disadvantages
Can be moisture-sensitive if not sealed properly
Not as structurally strong as plywood or solid timber
Ideal for:
Homes seeking a clean, modern, painted finish at a practical price point.
Pro Tip:
Use moisture-resistant MDF in kitchens and laundries, and ensure edges are well sealed to prevent swelling over time.
3. Plywood
Plywood is made by layering thin sheets of timber veneer, glued together with alternating grain directions. This cross-layer construction gives it strength and stability.
Advantages
Strong and lightweight
Better moisture resistance than standard MDF or particleboard
Holds screws and hardware securely
Disadvantages
More expensive than MDF or particleboard
Exposed edges may require finishing for a refined look
Ideal for:
Homeowners wanting a balance between durability and performance, especially in high-use kitchens.
Pro Tip:
Choose high-grade plywood for cabinetry to ensure consistency and minimise internal voids.
4. Particleboard
Particleboard is manufactured from wood chips and resin pressed into sheets. It is commonly used in budget-friendly cabinetry.
Advantages
Affordable
Widely available
Suitable for low-load applications
Disadvantages
Lower structural strength
More vulnerable to moisture damage
Shorter lifespan compared to other materials
Ideal for:
Projects with tight budgets or low-demand spaces where long-term heavy use is not expected.
Pro Tip:
If using particleboard, ensure proper sealing and avoid high-moisture environments unless specifically moisture-resistant grades are selected.
5. Stainless Steel
Stainless steel cabinetry is widely used in commercial kitchens for its durability and hygiene. It has also gained popularity in modern residential designs.
Advantages
Highly hygienic and easy to clean
Resistant to heat and moisture
Contemporary, industrial appearance
Disadvantages
Shows fingerprints easily
Can create glare under certain lighting conditions
Ideal for:
Minimalist or industrial-style homes seeking a sleek, professional aesthetic.
Pro Tip:
Opt for fingerprint-resistant finishes and plan lighting carefully to reduce harsh reflections.
There is no single “best” cabinet material — only the right one for your situation. Budget, lifestyle, humidity levels, design preference, and expected wear all play a role in making the right choice.
The key is selecting materials intentionally, rather than simply choosing what looks good on display.
As part of our recent Sunnynook townhouse project, our BoxMakers team designed and delivered kitchens for every last one. With brand new contemporary homes, we had to adapt our kitchen game to match.
When it came to designing these kitchens, the chief concern was making an aesthetic match with the existing build. But since our construction division was handling the home itself, we were able to coordinate flawlessly to execute a synchronised vision.
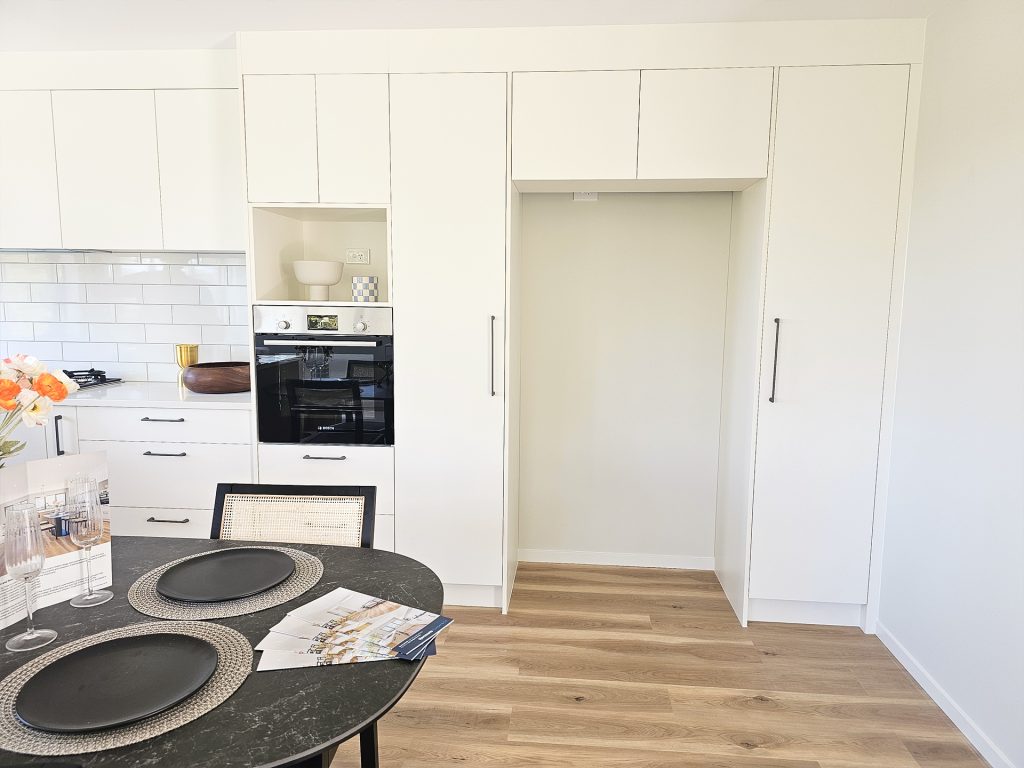
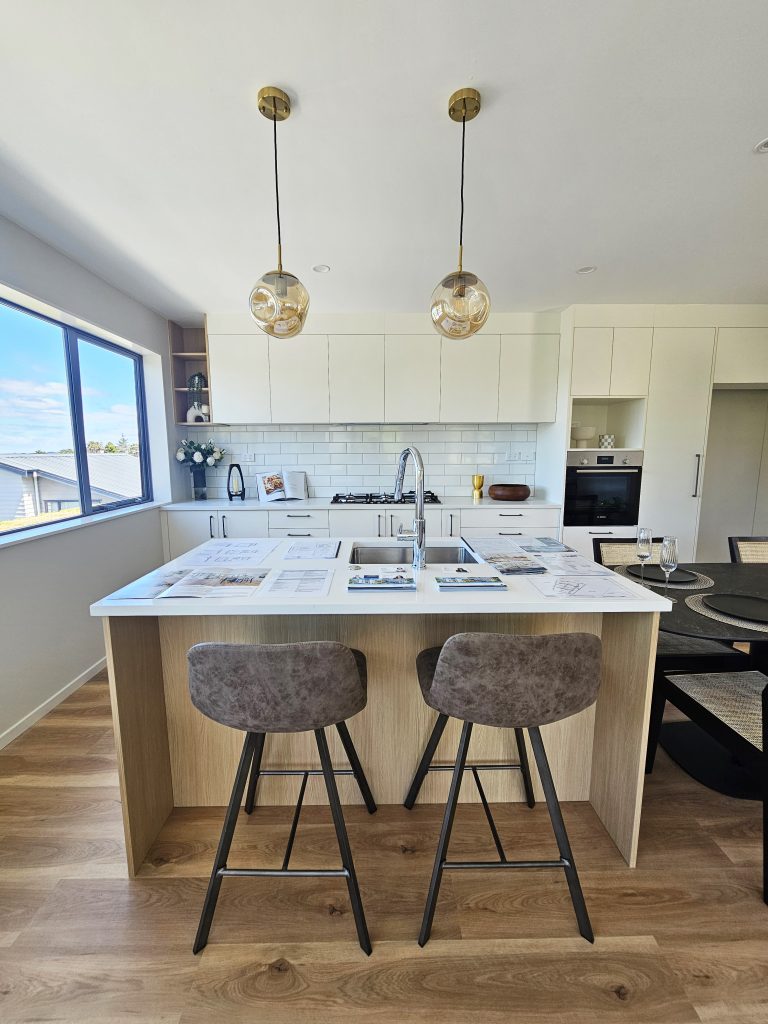
In unit 1 of this project, the kitchen was located on the upper level. Featuring a broad single-wall & island layout, this smart and modern kitchen is teeming with details waiting to be picked apart. We picked a smooth white to match the inner and outer walls, specifically Quarter Thorndon Cream from Prime Panels – a colour we kept consistent across these new homes. In unit 1, this is kept consistent from end to end.
The overall style takes inspiration from Scandinavian minimalism, and subtly applies it to a modern and contemporary aesthetic. Thanks to our excellent craftsmanship, the cabinetry gaps are flush, consistent, and perfect, making for not only a satisfying layout, but also appearance.
While the overhead cabinets are handleless, the under-bench units feature Mardeco’s bar pull handles in gunmetal. With a flared-base design, these grips embody a tough-yet-graceful look.
Ornamenting the splashback is a subway tile arrangement in glossy white. This is sat over UniQuartz’s White Sand benchtop, whose detailed granules gracefully give detail to the arrangement.
Opposite, we see our first foray from Melteca’s Aged Ash finish applied to the kitchen island. With a generous overhang and still enough room for appliances & a sink, this island is the perfect complement to a kitchen that has it all.
Designed by: Mona Simathamchai
Looking for new cabinetry or thinking about a kitchen renovation? Call us on 09 827 1177, or chuck us an email at [email protected]
Often notorious for being the most expensive amongst interior work, pricing a kitchen renovation can be a scary process, especially if your ambition outpaces your budget. This was the case for many decades, where it was only possible to get high-end looks with high-end spending – but no longer. Getting a film-worthy kitchen is more viable than ever.
Attaining a pricey-looking kitchen for cheap is all about distributing your budget. For a typical kitchen, you should put an emphasis on visuals. Walk through your kitchen as though it were an open home – what do you first see? The elements that take up the most visual real estate are the cabinetry and benchtop, then the lighting and splashback. A premium-looking kitchen revolves around aesthetic investment. This also works incredibly well for boosting your home value.
Here are some tips for the most essential parts of a kitchen:
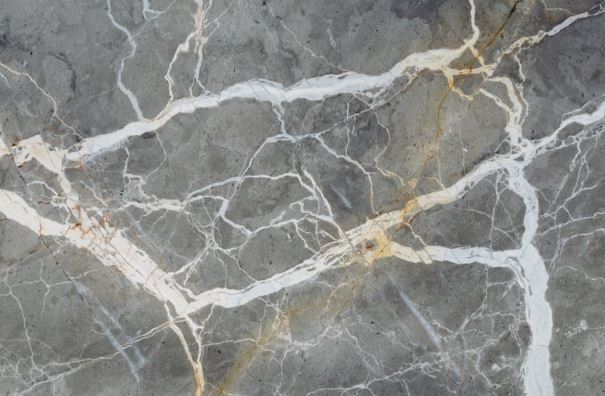
Benchtop – Getting the look and feel of genuine imported Italian marble used to be a costly endeavour. With engineered stone, you get superior durability and usability while accurately replicating the mesmerising tones and intricate weaves of Calacatta or Statuario – all for a fraction of the price.
Cabinetry – Consistence and modernity are key to making your cabinets punch above their weight class. MDF is a reliable core material, and can support an incredible range of surfaces from realistic veneers to glossy laminates. It can be an affordable combination for shiny cabinets in your colour of choice.
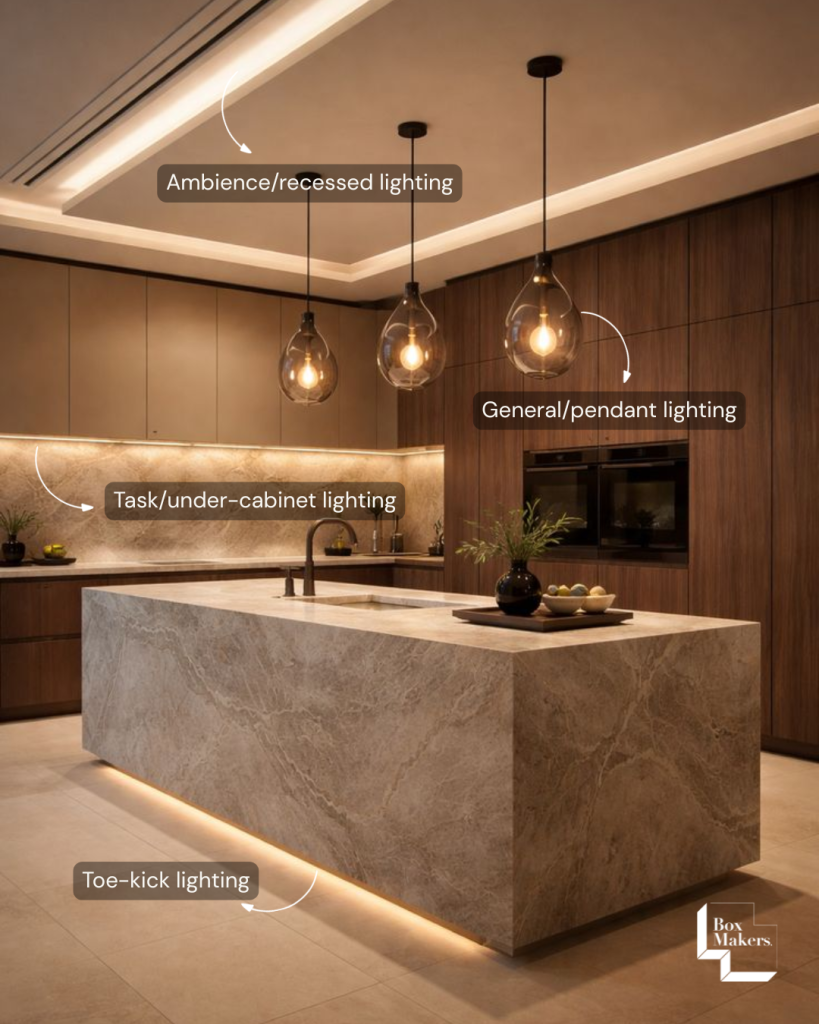
Lighting – Often overlooked as an optional kitchen accessory, good lighting can practically transform your kitchen. Pendant lights, under-cabinet lights, and toe-kick lights can seriously give the impression of a premium kitchen while adding practicality. Even a handful of select, budget-friendly options can make a big difference.
Splashback – While acrylic splashbacks may be the most affordable, they may not pass the eye test when under scrutiny. Tile splashbacks provide a genuine look and feel with plenty of affordable options. Both offer high variety in terms of looks but tiles will hold up better over time.
Layout – The flow of a kitchen is essential to a “luxury” feel. Openness is king in the modern landscape. Layout changes, however, can be an unnecessary expense as it requires more work in design and service connections. You should consider a layout change if your kitchen feels obstructed. A good kitchen should never feel difficult to enter.
Hardware – Complete your kitchen with finishing touches. Among kitchen hardware, handles are the most visually prominent. They can be subtle, eye-catching, or anything in between – even budget handles offer premium aesthetics nowadays. Tactilely, soft-close mechanism can make cabinet operation feel premium, and in-cabinet storage solutions provide practical packing – their value is seen through daily use.
Appliances – Pick mid-range appliances from known brands. Don’t be upsold on rarely-used features offered by their flagship range. Realistically, their mid-tier offerings have a more than ample feature set for day-to-day use.
Luxury doesn’t have to be replicated through cost alone. Through careful selection and thoughtful planning, you can achieve the look of kitchens many times your budget while still having incredible performance.
As the crown jewel of your kitchen, the benchtop doubles as both your aesthetic and functional centre. Subject to daily use, your kitchen’s operation revolves around your benchtop – whether it’s for food prep, storage, or dining. You’ll want to take care of your bench as well as it takes care of you, and it all starts with choosing the right care routine for your material. In doing so, here is a detailed guide for 4 different benchtop materials:
Natural Stone: An expensive, natural, and highly unique choice, genuine stone is chosen mainly for its one-of-a-kind patterns and premium aesthetics. While it may shine for looks and individuality, it is not an easy material to maintain. Natural stone’s porous nature means that without a seal, it can trap moisture and bacteria. Liquids that seep in can also alter its appearance by causing stains.
The most important aspect of maintaining natural stone’s sheen and integrity is to have it sealed regularly, typically once every 2 years for granite, and more often for lighter-toned materials (as they are typically more porous). This can be prolonged by maintaining the seal itself during cleaning. Using gentle, pH-neutral cleaners will stop it from breaking down. You’ll know the seal needs replacing if a drop of water seeps in or if it darkens the stone. Due to its unique aesthetics, physical repairs may not preserve the original look. Deep scratches will be more noticeable on natural stone as well, so avoid harsh objects. It is, however, remarkably heat-resistant.
Engineered Stone: Durable, non-porous, and moderately priced, engineered stone is a popular choice for kitchen benchtops. Its maintenance requirements are lower than natural stone, being easier to clean and perfectly uniform thanks to its composition of crushed quartz and resins – the latter being why it’s non-porous.
The resin binders fill the gaps and the slab is vacuum-compacted. It will be sufficient to clean the surface with mild soap and water. Spills can be wiped away without concern and scratches won’t compromise its integrity. While it’s highly durable, high levels of physical impact or heat can still damage the resin, so be sure to keep your hot pans away.
Laminate: Featuring even more aesthetic variety than engineered stone, laminate benchtops shine brightest for design diversity, affordability, and DIY-friendliness. Thicker offerings can mimic stone’s appearance at a much lower cost, though it certainly won’t mimic its physical properties. It’s key to know laminate’s composition: an engineered wood substrate with a surface layer of bonded resin, paper, and print. This makes it vulnerable to heat and sharp objects, so avoid placing those directly on the counter.
While laminate typically performs well against water, keeping it wiped down and dry can prevent rare cases of moisture-ingress, which can cause the material to swell or warp if there is an opening. Abrasive cleaning tools or agents can also damage the surface.
Timber: Timber benchtops are typically made of solid wood strips that have been bonded together and sealed. The core material is usually a hardwood and they’re known for their natural, warm appearances.
Similar to natural stone, its aesthetics depend on what is naturally available, and therefore is more limited. Another shared trait is their inherent porous nature, meaning regular sealing is required for continued use. To maintain it, apply an oil finish every 12 months and avoid harsh cleaners or chemicals. Instead, use soft cloths and warm water to clean it. Due to its similarities with laminate benchtops, they are not particularly heat or scratch resistant.
Each benchtop material has its strengths and weaknesses. As shown by natural stone (particularly marble), pricier doesn’t always mean more durable. Universally, all benchtops can benefit from gentle cleaning with warm water. Depending on the material, regular sealing can be a welcome protectional supplement or an essential layer for integrity preservation.
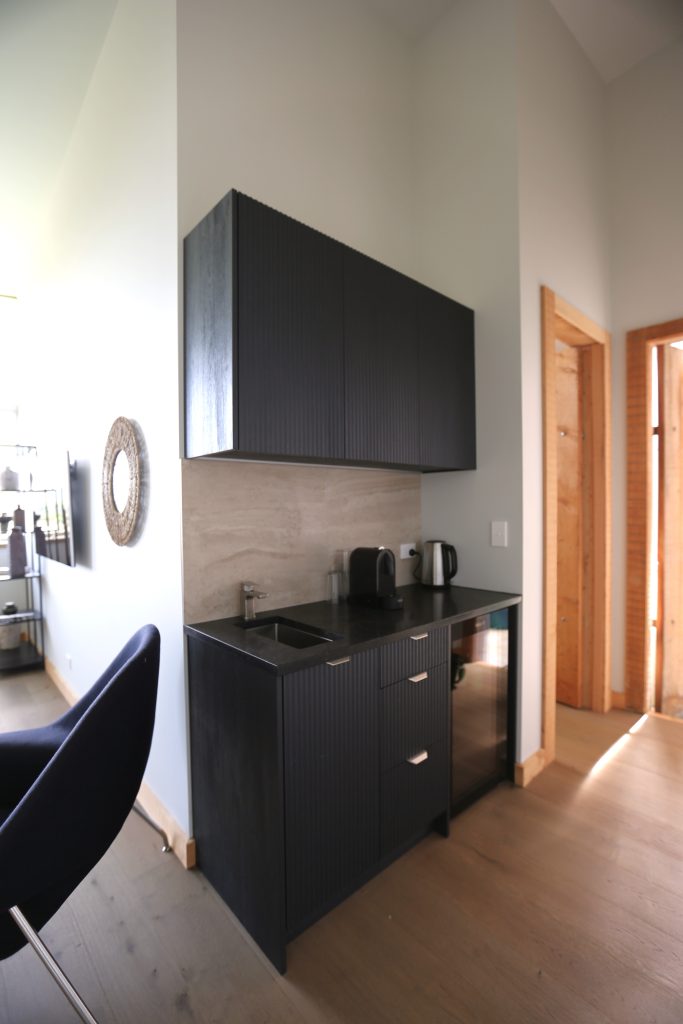
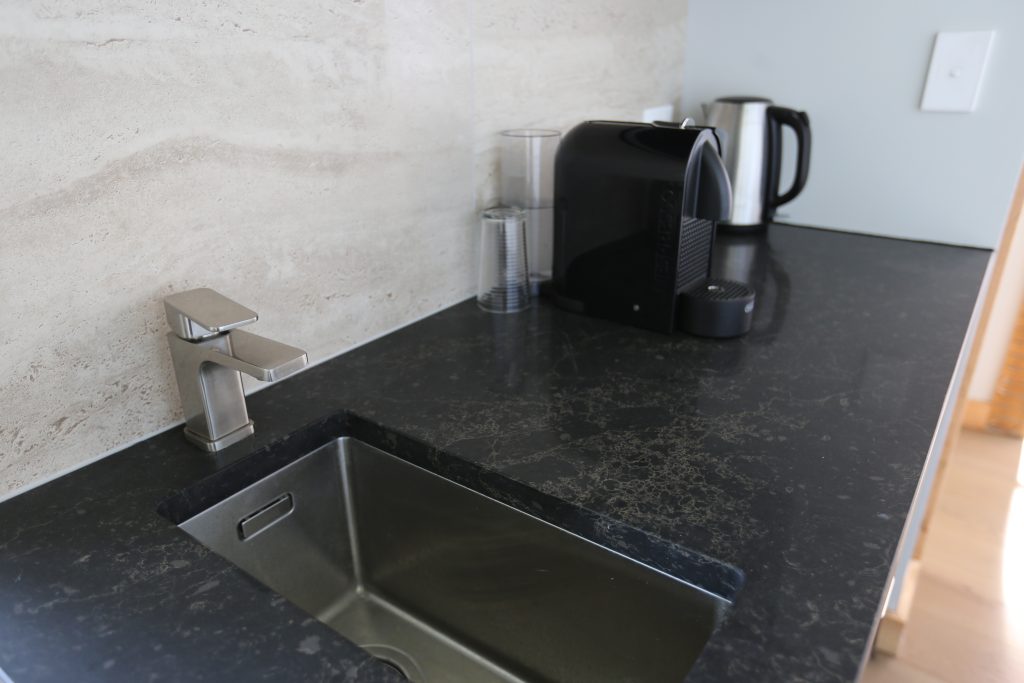
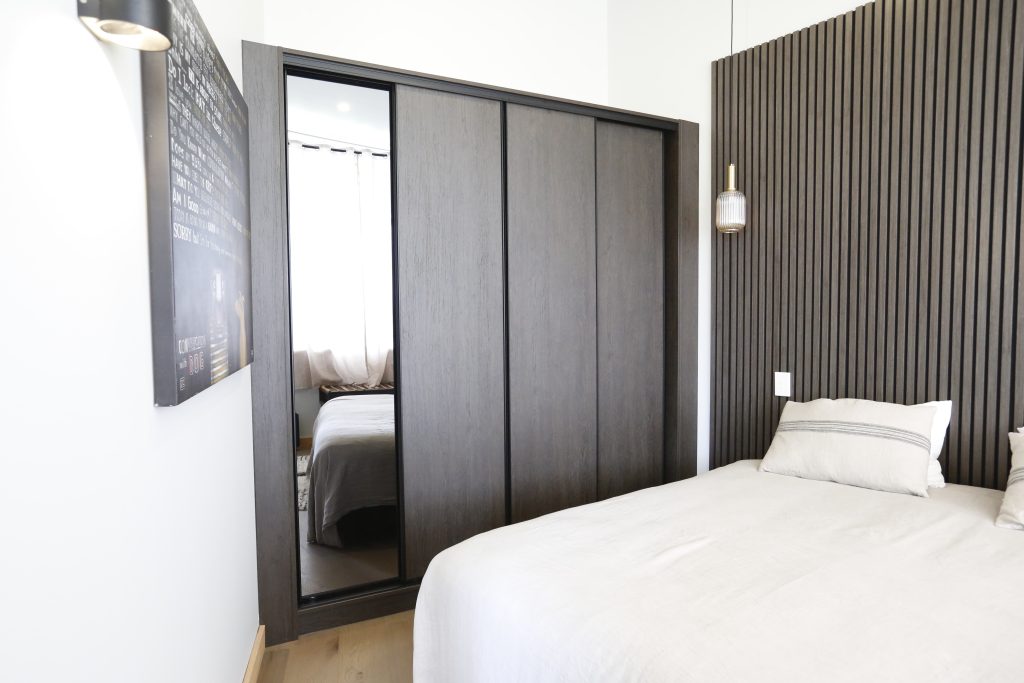
Tucked away in Tawharanui Peninsula, this reclusive yet beautiful home called upon BoxMakers for a wardrobe, mini pantry, and bathroom vanity. Crafted primarily for guest use, these upgrades were made to add both function and cosmetic coherence. Being within a luxury home, BoxMakers took great care to not only uphold, but elevate its high-class standards.
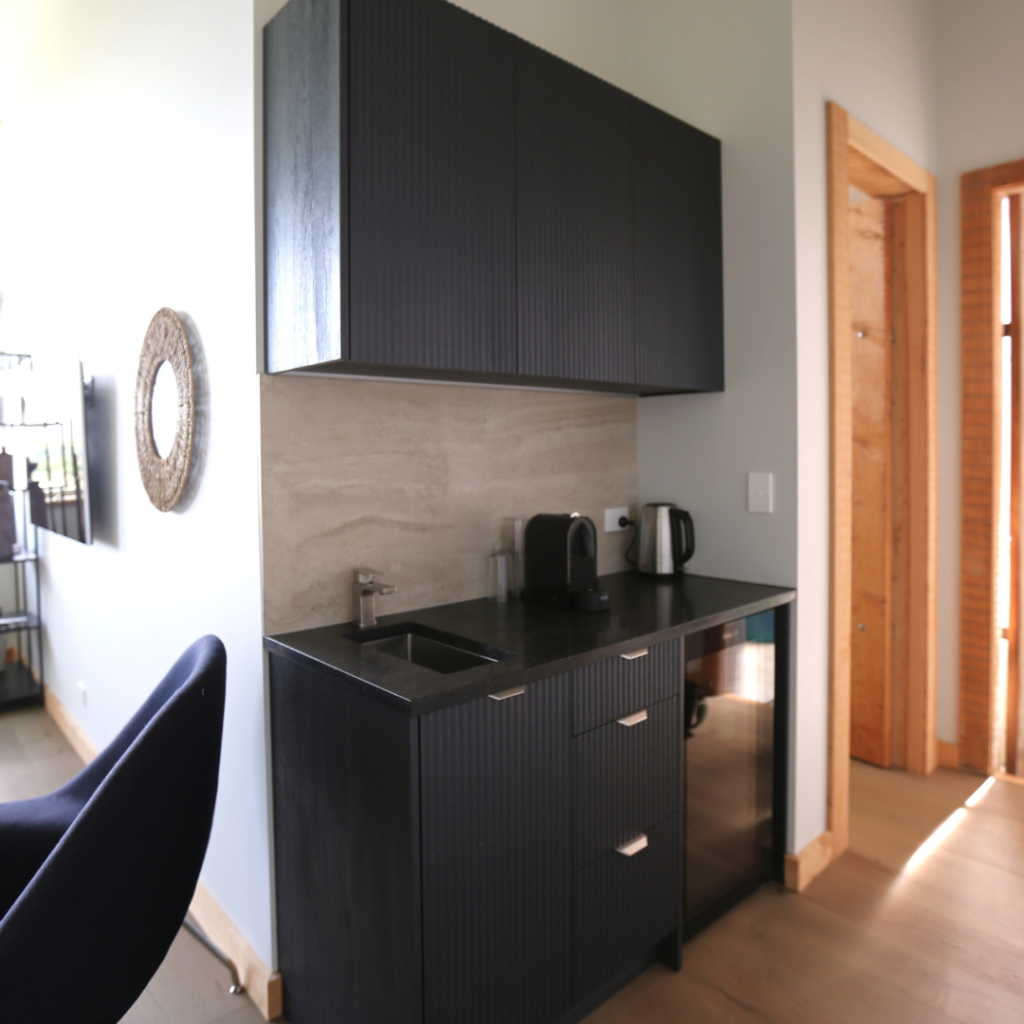
The unique onyx theme stemmed from both the owner’s preference, as well as the surrounding textures. Most notable is the vertical fluting on the face panels, which was inspired by the suite’s woodwork. For this, BoxMakers used Dezignatek’s Prague series of Thermofoam, finished in Black Bark. The deep, tactile ridges bring forth a unique modern design, especially when combined with its trapezoidal handles from Mardeco’s 3210 range. The Brushed Nickel finish adds a distinctive steely touch.
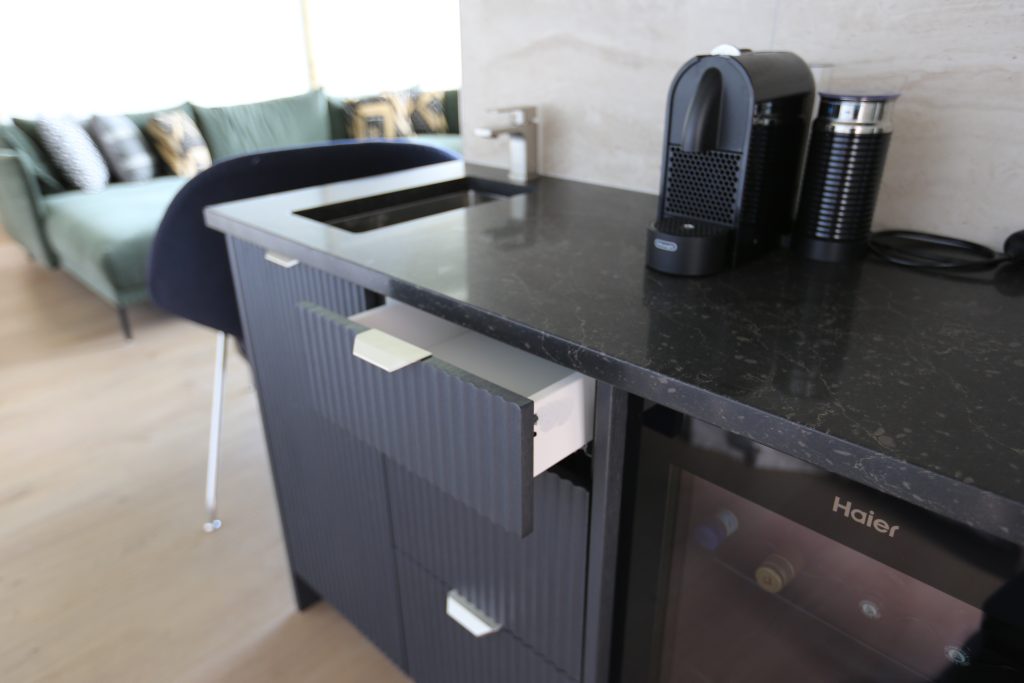
Above, the benchtop marks the return of UniQuartz’s Brown Forest finish, an ideal pairing for dark coloured cabinetry. Stealthily streaked with earthy veins, it effortlessly adds both character and nuance to this quaint kitchenette. The overhead cabinets operate on a handleless design and offer plenty of storage space while below, a mini bar is perfectly situated for a refreshing summer drink. Combined, it encourages visitors to feel like more than just a guest.
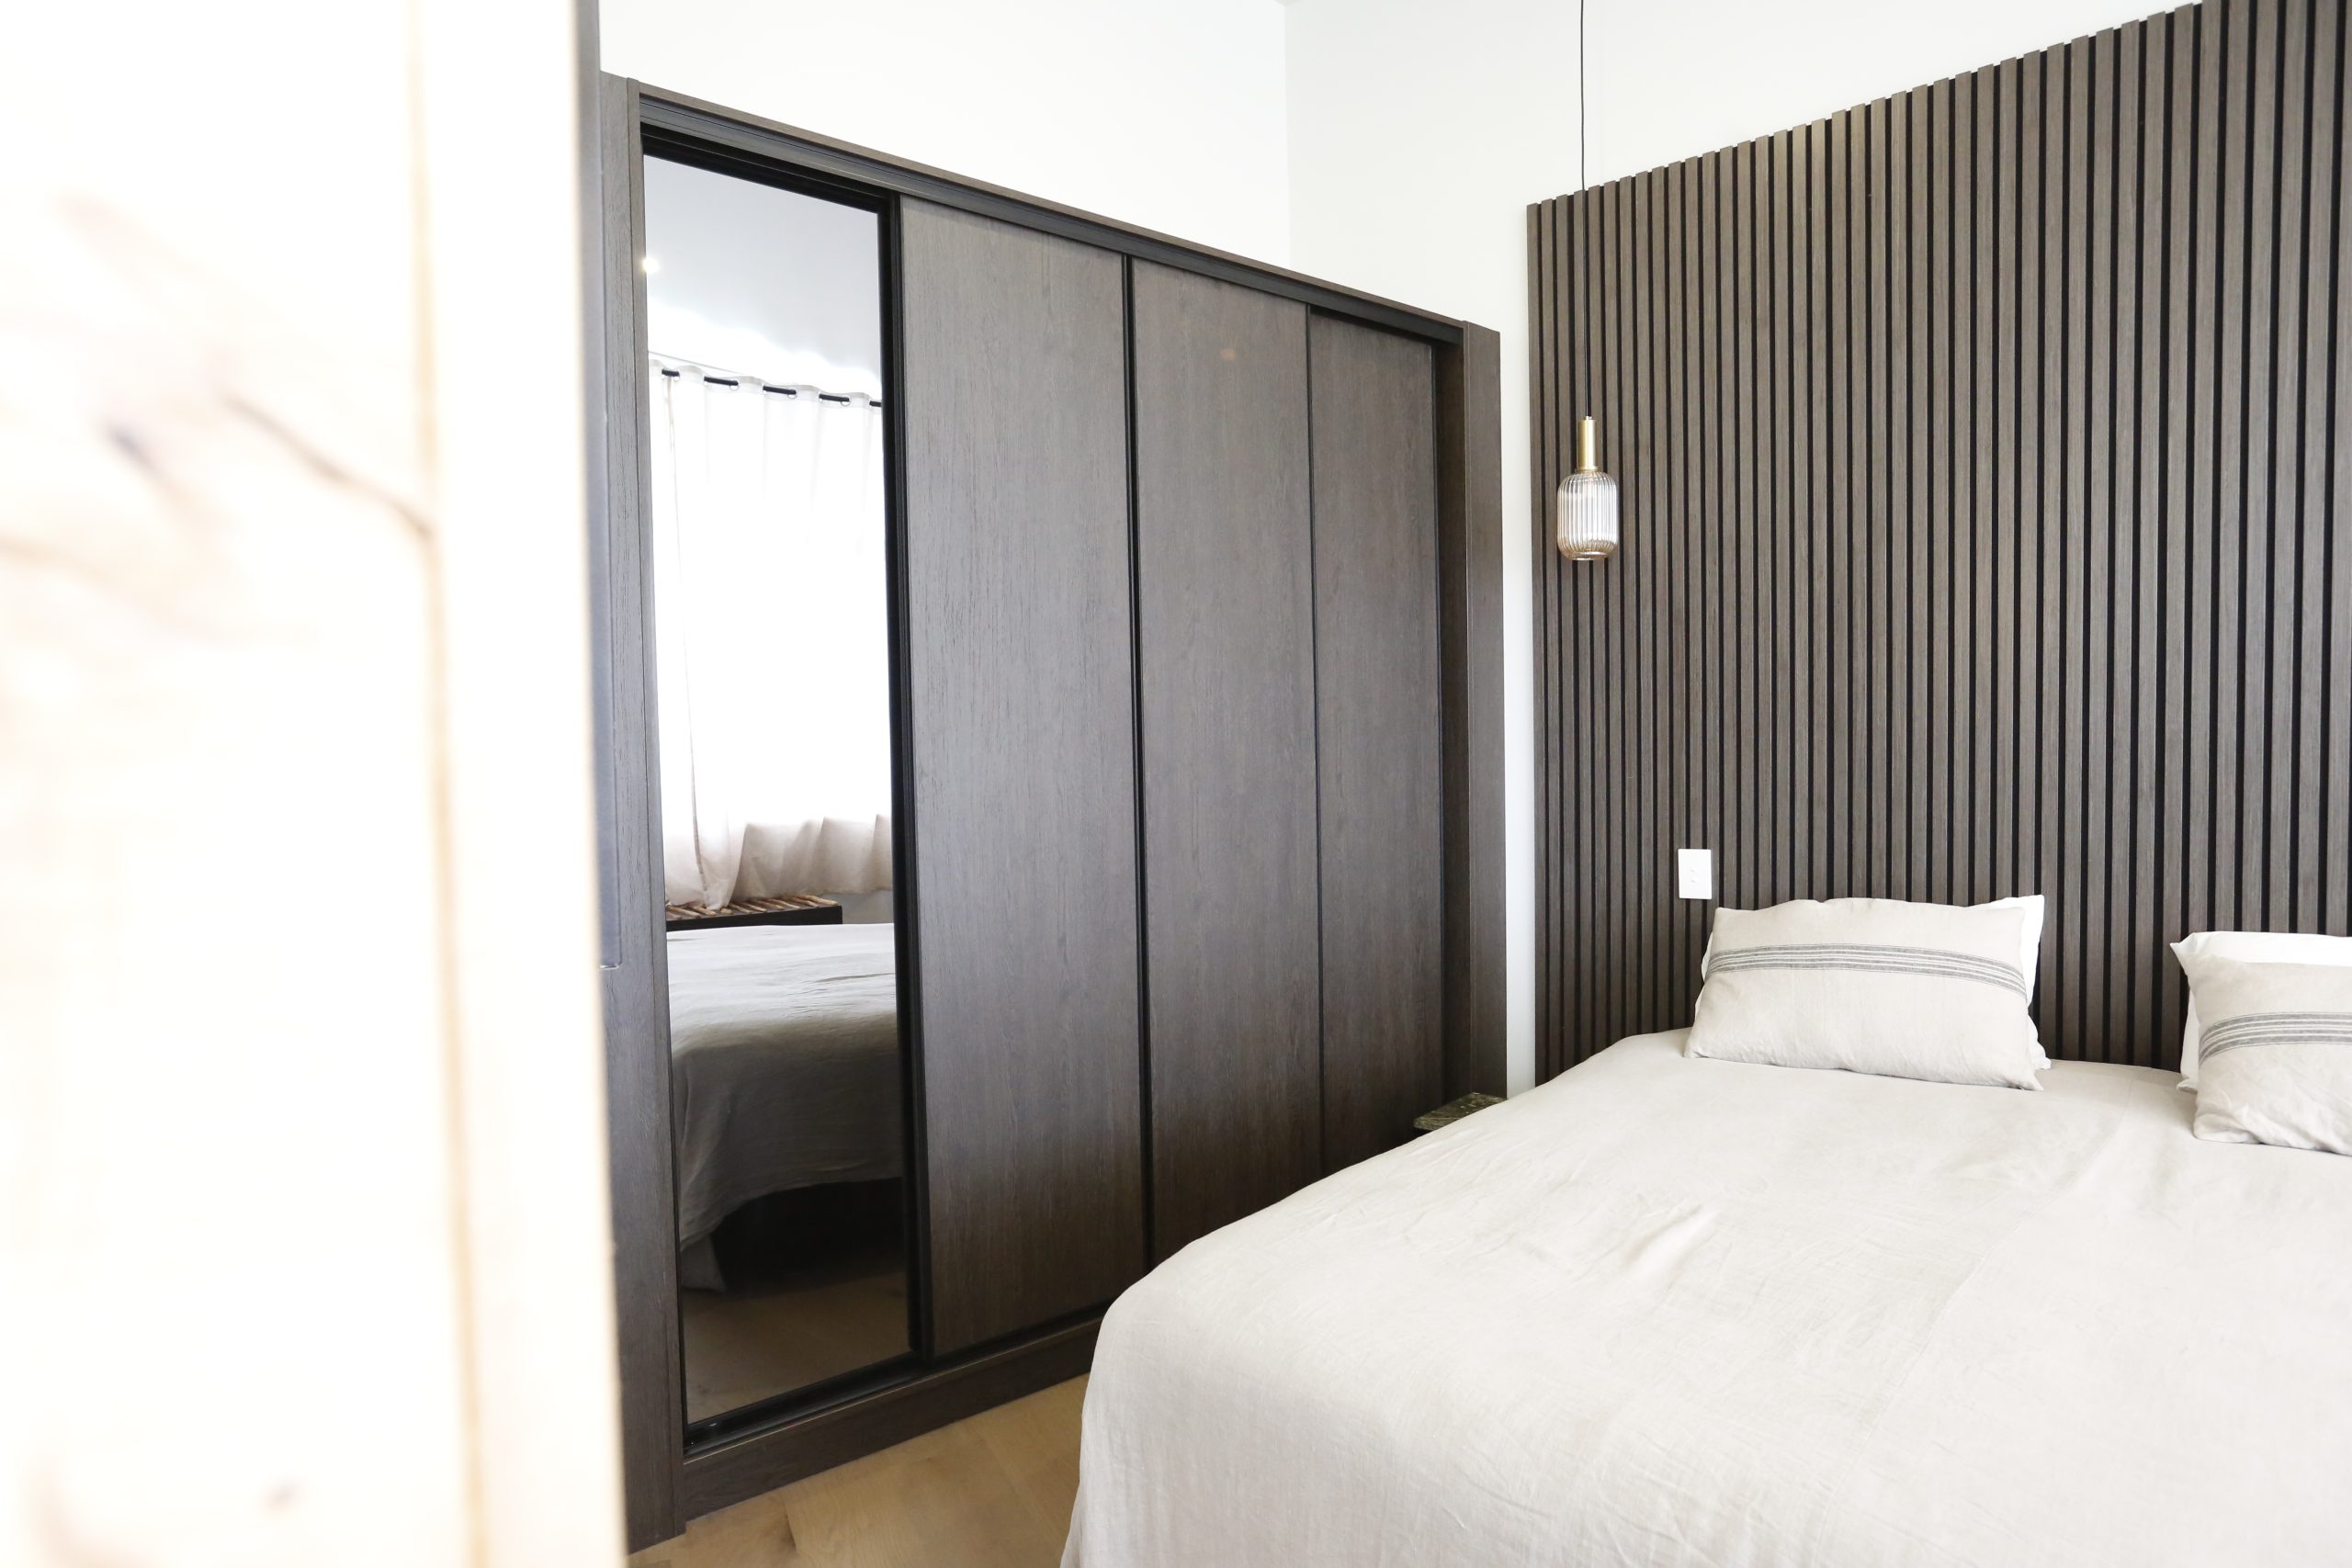
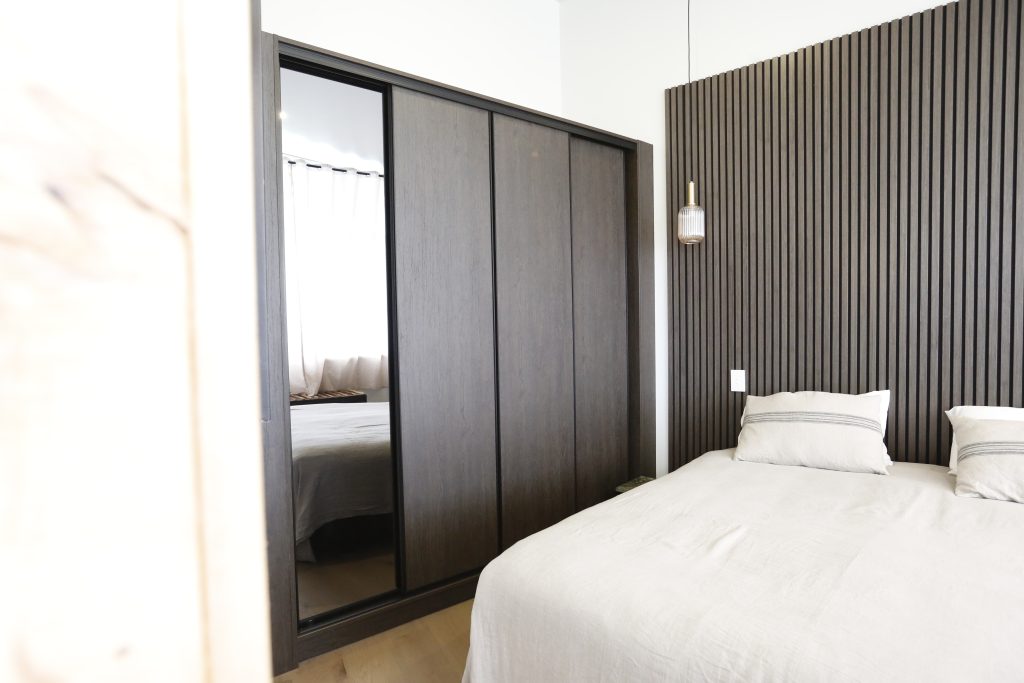
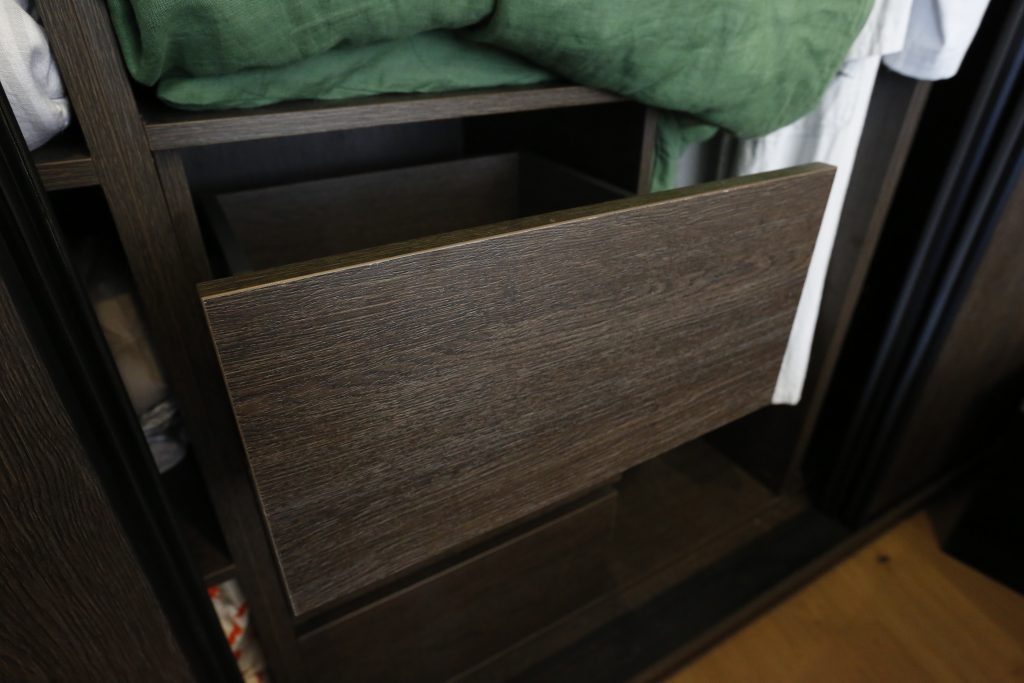
In the guest bedroom, BoxMakers installed a full-fledged wardrobe unit featuring a complete suite of drawers, shelves, and rods, as well as a full height mirror. Finished in Melteca’s Borders Oak Organic, this wardrobe fits perfectly with the bedroom’s fluted wall panel. We aimed to maximise smoothness and operability with Enko’s Anthracite-finished Slimbox drawer system. Even the wardrobe rails came in black, sourced from SD Aluminium.
Also part of our renovation work was the bathroom vanity, which featured the same Dezignatek fluted panels and Mardeco handles. Unique to the bathroom was the carcass material, which sported a mixed core plywood substrate for improved strength and weight support. This kept the design language consistent while also being highly performant.
This renovation appears sleek and modern at a distance, but only upon closer inspection will you find the natural elements intertwined within; a hidden gem, much like the residence as a whole. Combined with sprawling views of Kawau Bay, every guest is sure get the full luxury experience.
Designed by: Mona Simathamchai
Looking for new cabinetry or thinking about a kitchen renovation? Call us on 09 827 1177, or chuck us an email at [email protected]
BoxMakers helmed this beautifully unique kitchen renovation project in Greenlane. Combining the best of both traditional and modern design cues, this highly imaginative transitional-style kitchen touts a prominent raised-panel motif alongside a minimalist benchtop arrangement for a clean yet eminently personal space.
The original kitchen featured a mid-century modern design with a U-shaped layout. Removing the dividing peninsula was a core component of the renovation, as it became more of a barrier than a functional island. Elsewhere, the rest of the kitchen featured aging appliances and cabinetry.
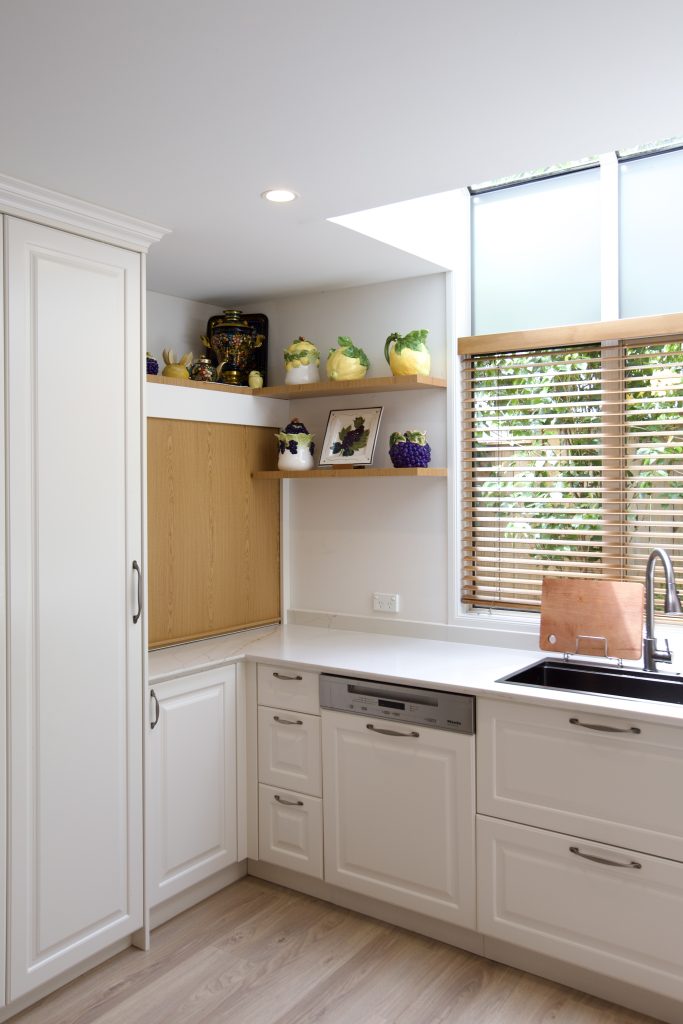
Central to the theme of the new kitchen was traditionalism, in line with the design language of the house as a whole. Staying true to the original cabinet faces, we chose new panels that maintained the raised profiles. Dezignatek’s Marseilles line was selected, in Alabaster Satin – a warm white that can take on different tones depending on the light. This extended to all of the cabinetry from the drawers to the overhead units, and even the tall pantry cabinets.
Removing the dividing peninsula made the kitchen much more freeing. This, combined with the upheaval of the original octagonal shape, provided the kitchen with significantly more room than before – in terms of both movement and storage. Stefano Orlati’s 1186 series handles were chosen, finished in Antique Tin. This provided an ornate, yet practical appearance. Completing that is the crown moulding above the cabinetry, which adds traditional ornamental detail.
On the outside, it looks like a quaint transitional-style kitchen but inside, it has been rigorously fitted with the latest in cabinet solutions, soft-close drawers, runner sets, hinges, and LEDs. The cabinets feature Häfele’s drawer systems and Hideaway bins. Also supplied by Häfele are Kesseböhmer’s Dispensa Pantry, LeMans II corner unit, and 2x Base Cabinet Pull Out sets.
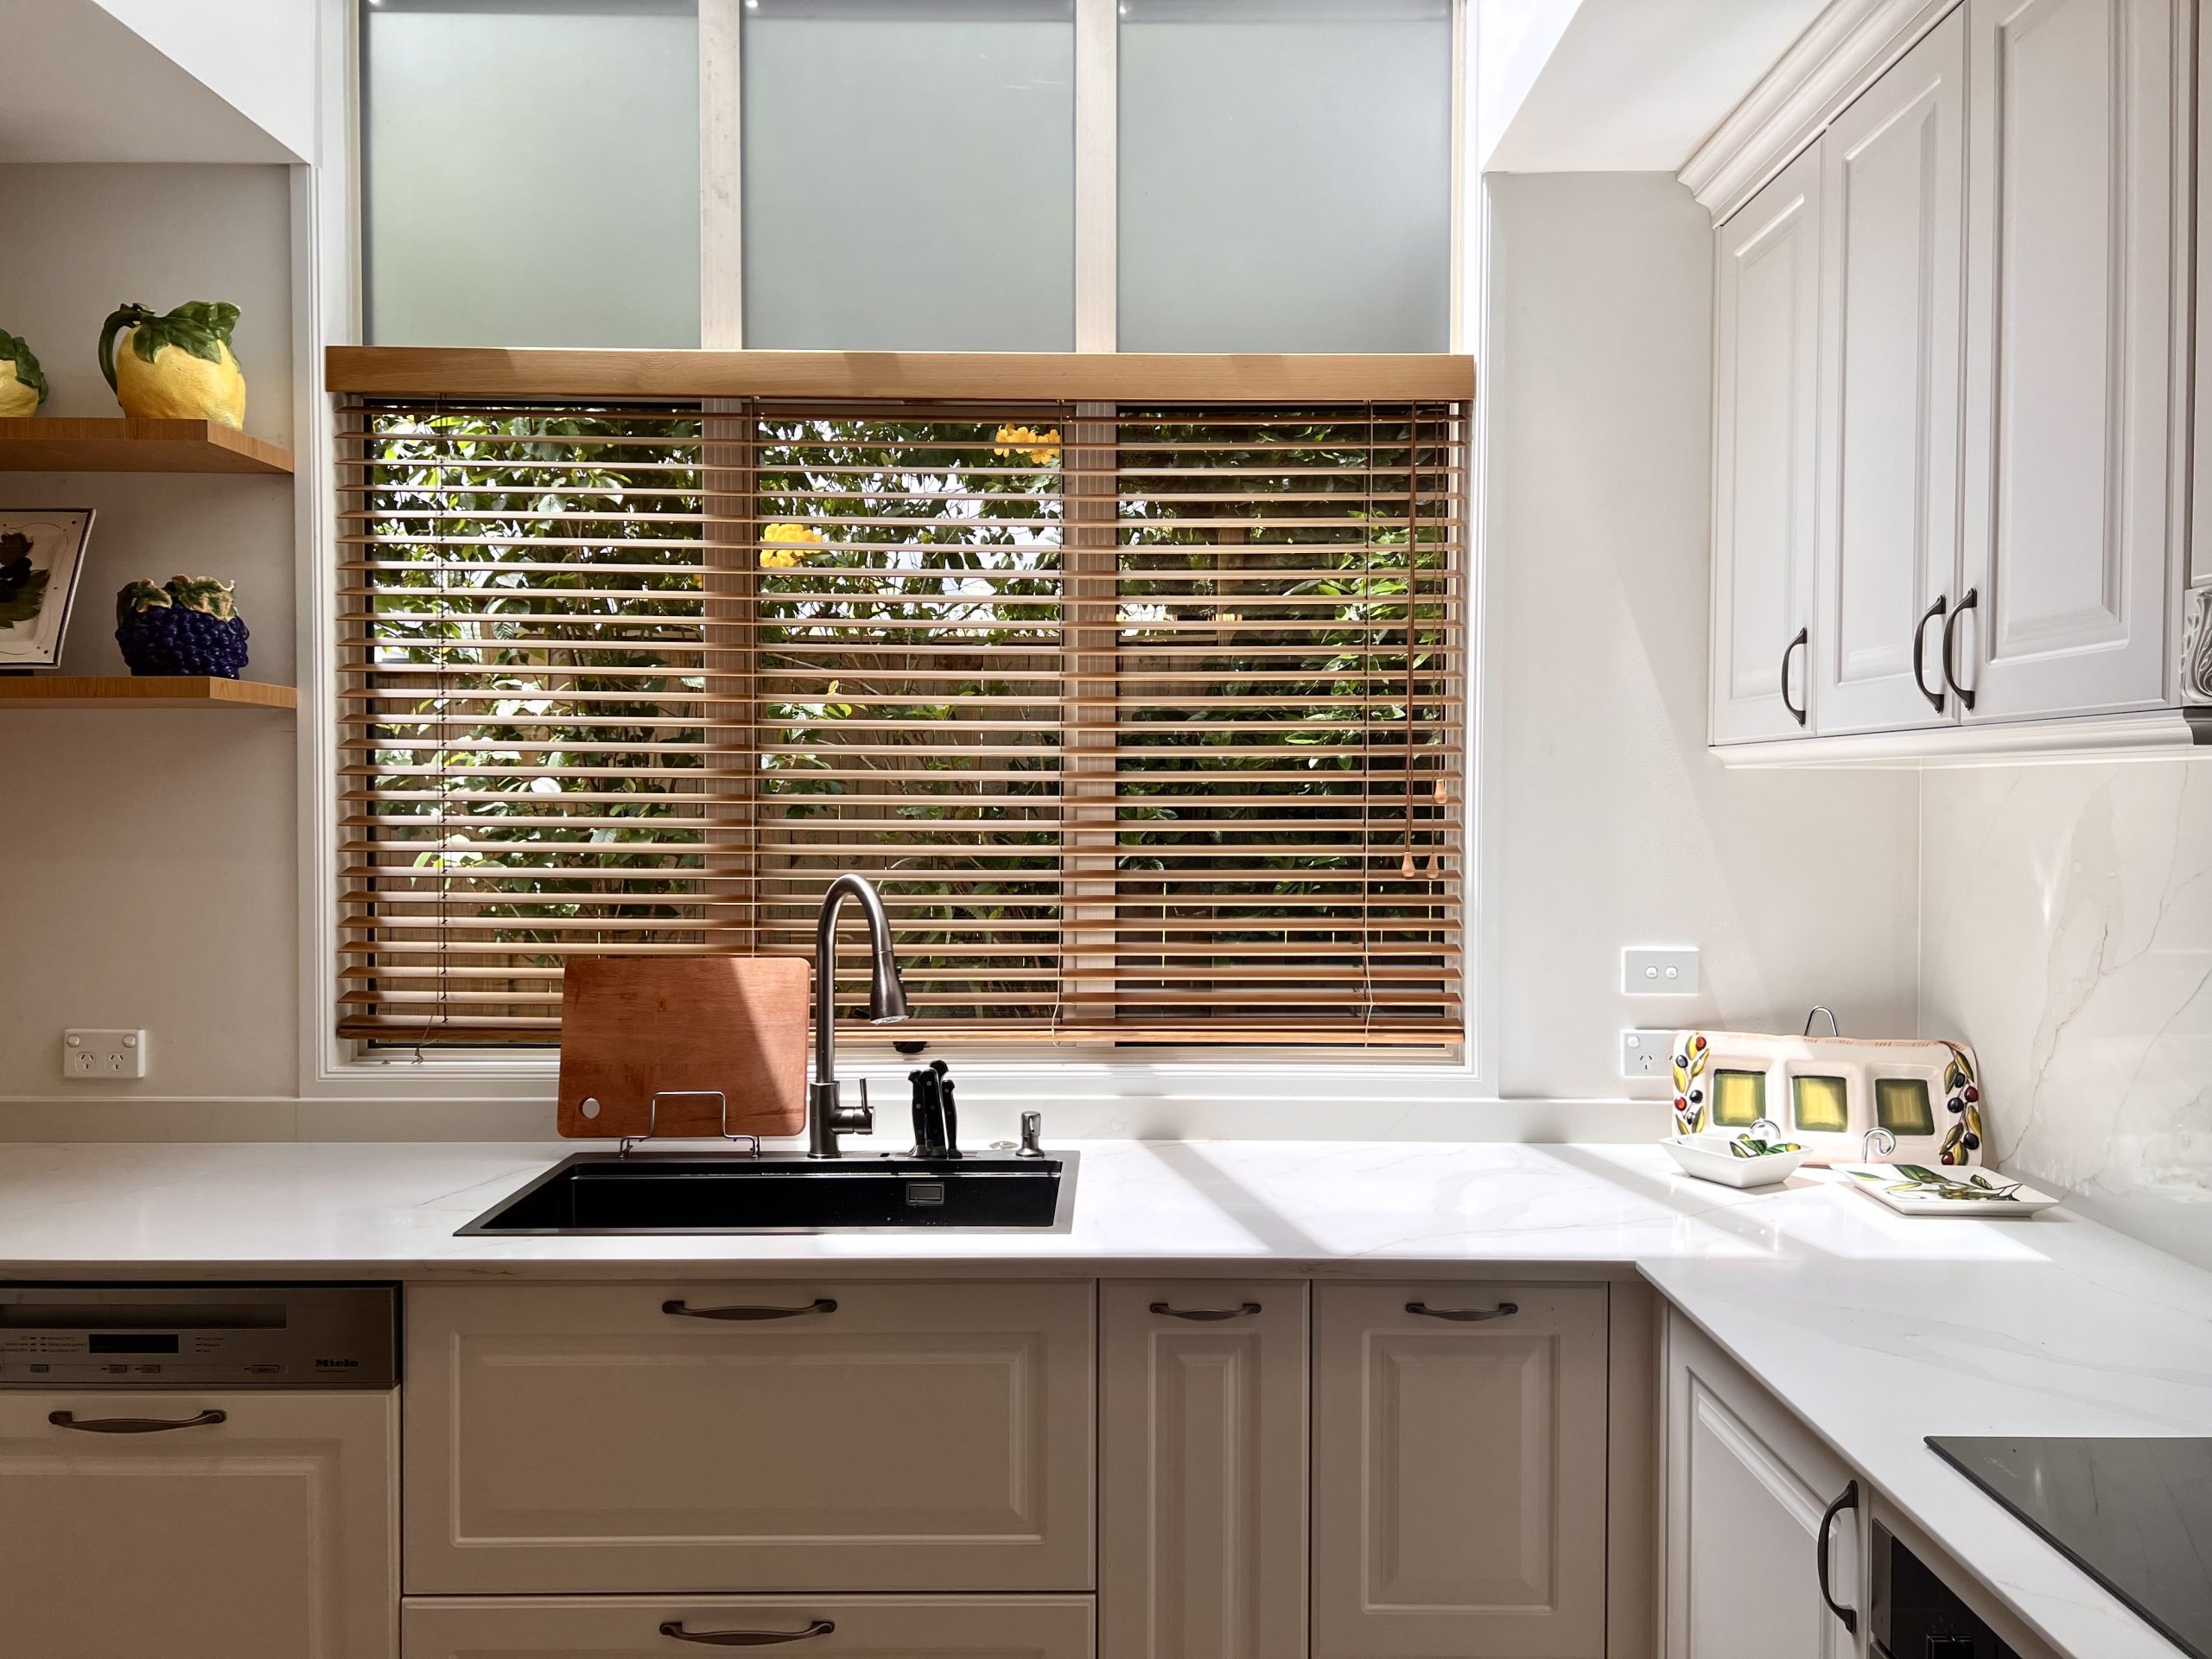
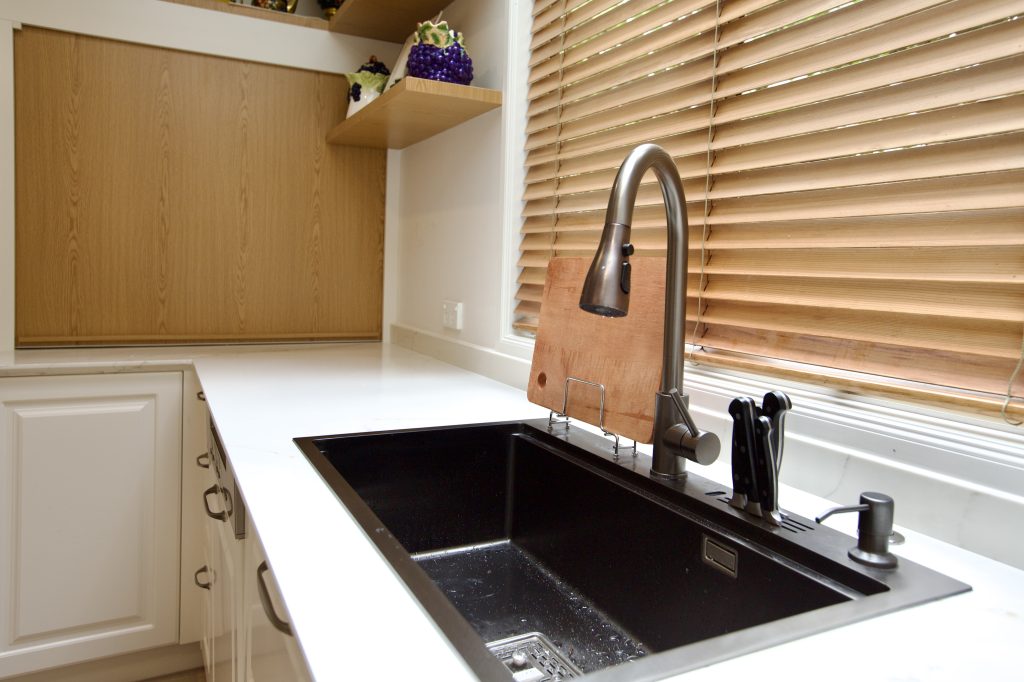
The benchtop is engineered stone – Uniquartz’s Light Vein, a pale 30mm cut featuring delicate brown lines. This design extends to the splashback for a cohesive and finely detailed kitchen. Both the cooktop and sink feature minimalist, low-profile designs. Behind, the wooden blinds give the room an organic touch as it combines seamlessly with the greenery outside – a detail that was replicated from the previous kitchen.
This transitional kitchen is completed with a fascinating blend of traditional aesthetics with modern features. Its appearance is timeless, yet functionally advanced. The old kitchen’s essence is not lost, but renewed; steeped in history and brimming with stories to tell.
Starting a kitchen, laundry, or cabinetry project often feels like a big step. Many homeowners worry they need drawings, firm budgets, or final decisions before reaching out. In reality, your first enquiry is simply the beginning of a conversation. It allows us to understand your situation, explain what is possible, and help you move forward with clarity.
The process is designed to be collaborative, flexible, and low pressure. Whether you already have plans or are only exploring ideas, we guide you step by step so you can make confident decisions.
1. Project type and feasibility
After your first enquiry, we begin by understanding the basics of your project. We look at the type of work you are considering, the scale, your preferred timeline, and the location. This initial review helps us confirm feasibility and identify any early considerations that may affect design, cost, or scheduling.
2. Consultation & Quotation
If you already have drawings, we review them together. If you don’t, that is completely fine. Many homeowners contact us before plans exist. We will either invite you in for a discussion or arrange a call to learn more about your goals — how you want the space to feel, materials you like, practical needs, and any budget expectations. From there, we can organise a free site visit where needed and provide an initial quote to help you understand the investment range.
3. Quote Review & Approval
Once you receive a quote, you have space to consider your options. Comparing suppliers, asking questions, and adjusting scope is a normal part of the process. We encourage homeowners to seek clarity rather than rush decisions. If changes are required to align with your budget, we work through alternatives together — whether that means adjusting materials, storage solutions, or layout details.
4 Final measurement and Production
When you decide to proceed, a deposit allows us to move into the technical stage. We carry out a final site measure to ensure every dimension is accurate. Using those measurements, we prepare detailed drawings for your approval before production begins. This stage is where design intent becomes precise, ensuring cabinetry fits your space properly and performs as expected.
Material options and design refinements remain open throughout the process. Decisions are not locked in too early, and discussions continue from the first consultation through to final drawing sign-off. This approach allows the project to evolve while keeping expectations clear.
The most important thing to understand is that contacting us does not commit you to anything. It simply gives you access to professional guidance early, when decisions are easier and less costly to adjust. Cabinetry is a long-term investment, and thoughtful planning is what protects both the outcome and your budget. Our role is to work alongside you so the finished space reflects how you live, not just how it looks on day one.
👉 Looking for new cabinetry or thinking about a kitchen renovation? Call us on 09 827 1177, or chuck us an email at [email protected]
Designing a new kitchen is exciting. It is also a significant investment, and the decisions you make will affect how you live every day. Each year, we meet homeowners who wish they had approached certain cabinetry and layout choices differently. Most regrets are not dramatic design failures. They are small, practical oversights that slowly become daily frustrations.
Here are the most common cabinetry regrets we see and how to avoid them:
Functional and Layout Mistakes
1. Insufficient storage
One of the biggest regrets is insufficient storage, particularly the lack of deep drawers in base cabinetry. Traditional cupboards with shelves may seem cost-effective, but they make it difficult to access pots, pans, and heavier items. Deep drawers provide better visibility, easier access, and more efficient use of space.
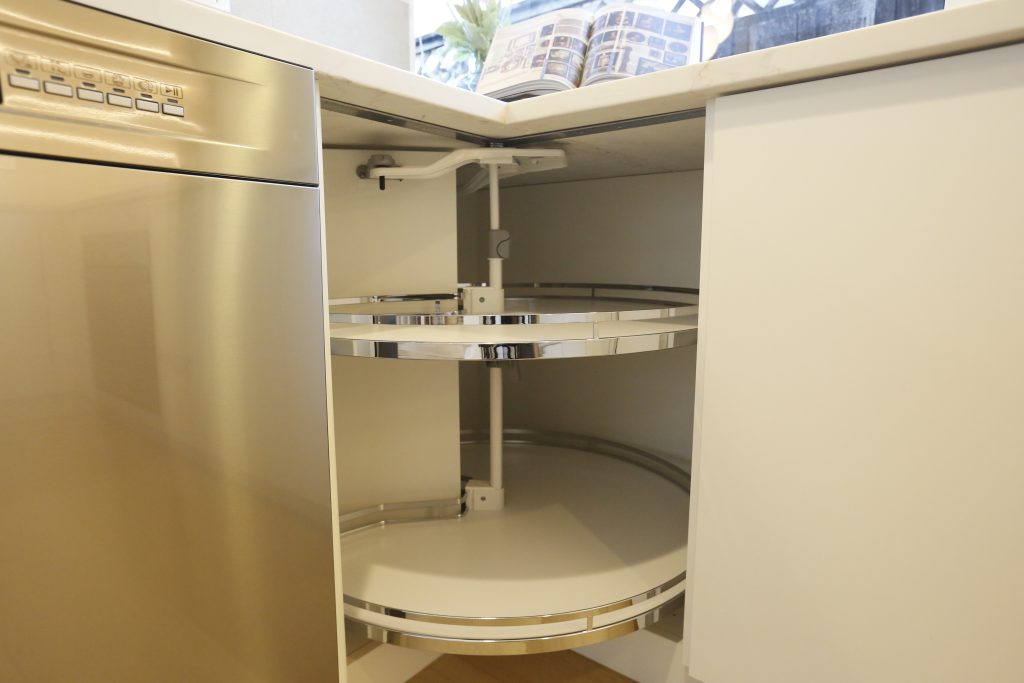
2. Poorly design corner storage
Corner cabinets are another frequent issue. Corners often become dead space or are fitted with outdated, inefficient mechanisms that do not fully utilise the area. Thoughtful corner solutions like pull-our storage systems or lazy Susan, can dramatically improve storage capacity and accessibility.
3. Low quality materials
Low-quality materials and hardware are a regret that tends to surface a few years after installation. Particleboard that swells, thin hardware that loosens, and weak drawer runners that fail under weight all lead to premature repairs or replacement.
4. Electrical needs
Overlooking electrical needs is another regret that only becomes obvious once you start living in the space. Modern kitchens require ample power for appliances and everyday devices. Outlets should be carefully planned along benchtops, within islands, and even inside pantries. It is always better to allow for more power access than you think you need.
5. Not enough clearance space
Ignoring clearance space can make even a beautiful kitchen feel cramped. Adequate room must be allowed for doors and drawers to open fully and for multiple people to move comfortably around the space.
Design and Maintenance Regrets
6. High-maintenance colours and finishes
Cabinet colour and finish choices often lead to long-term dissatisfaction. Very dark cabinetry can show dust, fingerprints, and water marks. As a result, they typically require constant maintenance to look clean. High-gloss finishes can also create ongoing maintenance frustration, especially when paired with poor lighting. Surfaces that constantly show fingerprints and smudges quickly become tiresome to maintain.
On the other hand, highly trendy colours can date quickly. Many homeowners later wish they had chosen a more timeless base and introduced personality through elements that are easier to update.
7. Too much for splashback
Busy splashbacks are another frequent regret. Highly patterned or brightly coloured tiles may initially feel expressive, but they can overwhelm the space and compete with the cabinetry. A more restrained splashback, such as a timeless stone slab or subtle tile, often allows the cabinetry and architectural details to stand out while still adding depth and texture.
8. Monotone designs
A “flat” or overly monochromatic design is the opposite problem. When the splashback, benchtops, and cabinetry all match too closely, the result can feel dull and uninspired. Layering materials and finishes thoughtfully adds visual interest without overwhelming the space.
9. Treating lighting as an afterthought
Lighting is often underestimated. A kitchen needs a combination of ambient, task, and accent lighting to function properly. Without under-cabinet lighting, work surfaces can feel dim and impractical. Pendant lighting over islands should provide both functional illumination and considered design impact.
Non-Essential Gadgets
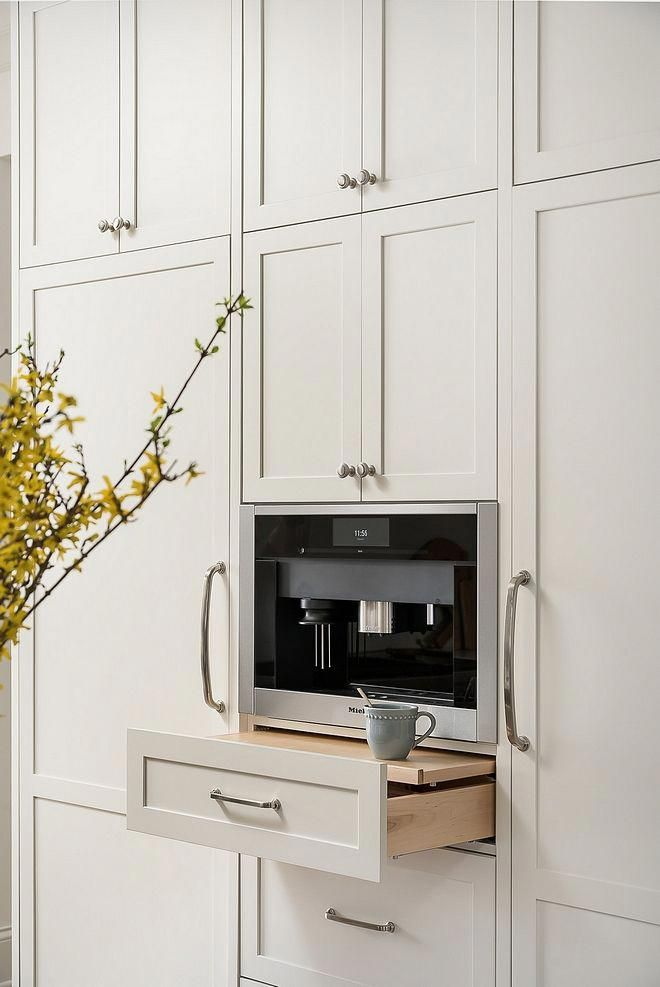
10. Unnecessary gadgets
Another regret we see is investing in luxury gadgets that look impressive but go largely unused. Features such as warming drawers, built-in coffee stations, or specialty taps can sound appealing in theory. In practice, they often become expensive additions that do not meaningfully improve everyday life. Instead, the most valued investments tend to be the practical workhorses: quality cooking appliances, reliable refrigeration, and well-designed storage. These are the elements that genuinely change how a kitchen performs.
The Common Thread
Most cabinetry regrets come down to one thing: prioritising appearance or trends over daily function. A kitchen should first and foremost support how you live. When storage, layout, materials, lighting, and proportion are carefully considered, the design naturally feels better and lasts longer.
Thoughtful planning at the cabinetry stage is what protects your investment. When the fundamentals are right, the kitchen not only looks impressive on completion day, but continues to perform beautifully for years to come.
Designed by: Mona Simathamchai
👉 Looking for new cabinetry or thinking about a kitchen renovation? Call us on 09 827 1177, or chuck us an email at [email protected]